Contact Us

Use the form on the right to contact us.

You can edit the text in this area, and change where the contact form on the right submits to, by entering edit mode using the modes on the bottom right. 

4108408118

Apple Blog

Filtering by Category: Green Plumbing

Toilet Repair Month

AdminSheila

OCTOBER IS:

NATIONAL TOILET TANK REPAIR MONTH!

I have been involved either part time or full time with the plumbing industry for over 47 years, and I never knew that there is a National Toilet Tank Repair Month.  Or I knew and just chose to ignore it.

Regardless, it is now at the forefront of my consciousness and I am compelled to comment on National Toilet Tank Repair Month.  First, who or what entity declared such a month?  I have no idea.  I’ve spent the last 30 minutes searching the internet for the answer to no avail.  Enough time wasted on that question.  But if a reader knows who made the declaration, let me know and I’ll send you an Apple Plumbing t-shirt!

Back to toilets. A leaking toilet can waste A LOT of water.  The EPA says 1 in 4 toilets nationally leak wasting up to 70,000 gallons per year each.  That’s a lot of water.

I am always leery of statistics so I like to “run the numbers”:

  • 70,000 gallons per year equates to 191.79 gallon per day

  • That translates to 8 gallons per hour or 2 ounces per minute

  • Two ounces of water is a quarter cup in a minute.

Try taking a ¼ cup of water and pouring it into a sink at a steady, consistent stream for one minute.  It’s really just a trickle.  Chances are that same trickle in a toilet tank would be almost silent.  So, I think the EPA’s numbers work…a small leak that trickles in your toilet tank can waste up to 70,000 gallons of water a year!

That’s A LOT of water!

Let’s say you have a well and your well pump is a 5 gallon per minute pump.  Your pump would have to run for 14,000 minutes to supply your leaking toilet.  That’s 233⅓ hours!  For almost 10 whole days your pump would have to run to supply water to your leaking toilet.

flush with cash

Or, let’s say you are connected to city water and sewer.  A quick check shows the City of Westminster charges $16.16 per 1,000 gallons for combined water and sewer.  Your 70,000 gallon running toilet would cost you $1,131.20 per year in water and sewer charges!  You could buy some seriously high efficient toilets for that kind of money.

So.  Now that we are aware of National Toilet Tank Repair Month and the high cost of a leaking toilet what are we to do about it?  Check your toilet for leaks!  Or have a plumber check your toilet for leaks, although it is much cheaper if you do.  Click on the following link for a video on how a toilet flushes.  The video was produced by plumbing manufacturer Korky Flappers.

How A Toilet Flushes by Korky Flappers.

There are really only two ways a toilet leaks. the first is through the fill valve in which the tank fills to the overflow tube and water just runs down the tube, into the bowl and down the drain.  If you lift the lid from the tank and see water up to the overflow tube and running down it, your fill valve is leaking.

The other way a toilet leaks is through the flapper at the base of the flush valve, if the flapper doesn’t seal tightly and water slowly leaks into the bowl and down the drain.  The easiest way to check for this type of leak is to place a few drops of dark food coloring in the tank and see if it shows up in the bowl.  You may have to wait up to 20 minutes for coloring to appear. It’s that easy.

Checking for a Toilet Leak using Dye Tablets

Leak Detection tablets will detect toilet leaks in minutes. Simply drop 1 into your toilet tank and wait a few minutes. Do not flush the toilet. If the toilet water turns blue, the seal around the flapper is leaking water from the tank to the bowl. This type of leak is often very hard to detect because it may not make filling or leaking noises or the fill valve may only kick on every 10 or 20 minutes (while you're not present). If your flapper is leaking, replace the flapper or toilet immediately. This is the most common water wasting problem in the home - it can rack up your water bill fast and you may not find out until you get your bill! If your toilet has a leak you could be wasting 200 gallons of water a day.

Water Cooler and Bottle Filler Combo at the Hill Family YMCA

Pat Scheper

bottlefiller.png

Last March (2017) Apple Plumbing installed this Elkay water cooler with bottle filler at The Hill Family Y in Westminster.  Members can fill their personal water bottles with cool filtered water saving our landfill from discarded plastic water bottles.  The water cooler is located just outside the workout room and gets constant use. Take a look at how many water bottles the members at The Hill Family Y have saved in the last year with this water cooler.  Well over 50,000!

bottlessaved.png

I did a little research and discovered that the Hill Family Y members saved over 29 barrels of oil that would have been used to make those 53,547 plastic bottles.  The Pacific Institute estimates that a ½ liter plastic bottle has a carbon footprint of 3 oz.  That means the members of The Hill Family Y have prevented 10,040 lbs. of carbon from entering our  atmosphere.

That’s 5 tons folks!!

In addition, it is estimated that in the good ole U S of A, it takes 1.39 gallons of water to produce 1 gallon of bottled water.  The .39 gallons go down a drain.  That means in the last year the Hill Family Y has saved roughly 2,767 gallons of water by using the bottle filler on this water cooler.

Way to go Hill Family YMCA !

New Water Heaters for The Hill Family Central Y

AdminSheila

YMCA 
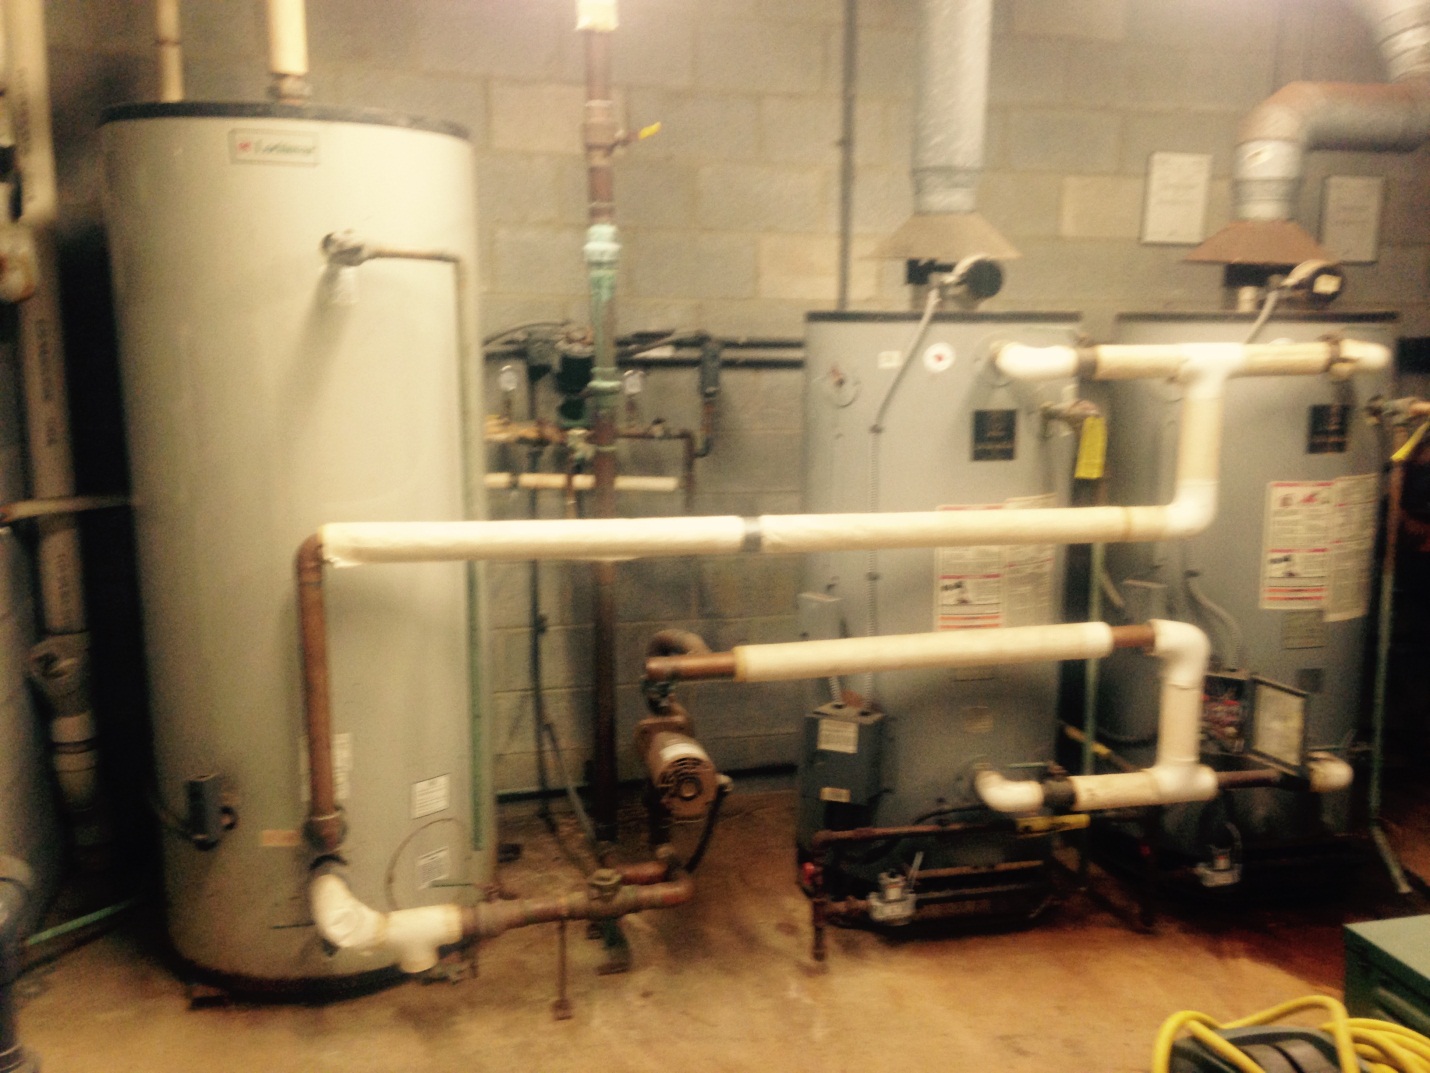
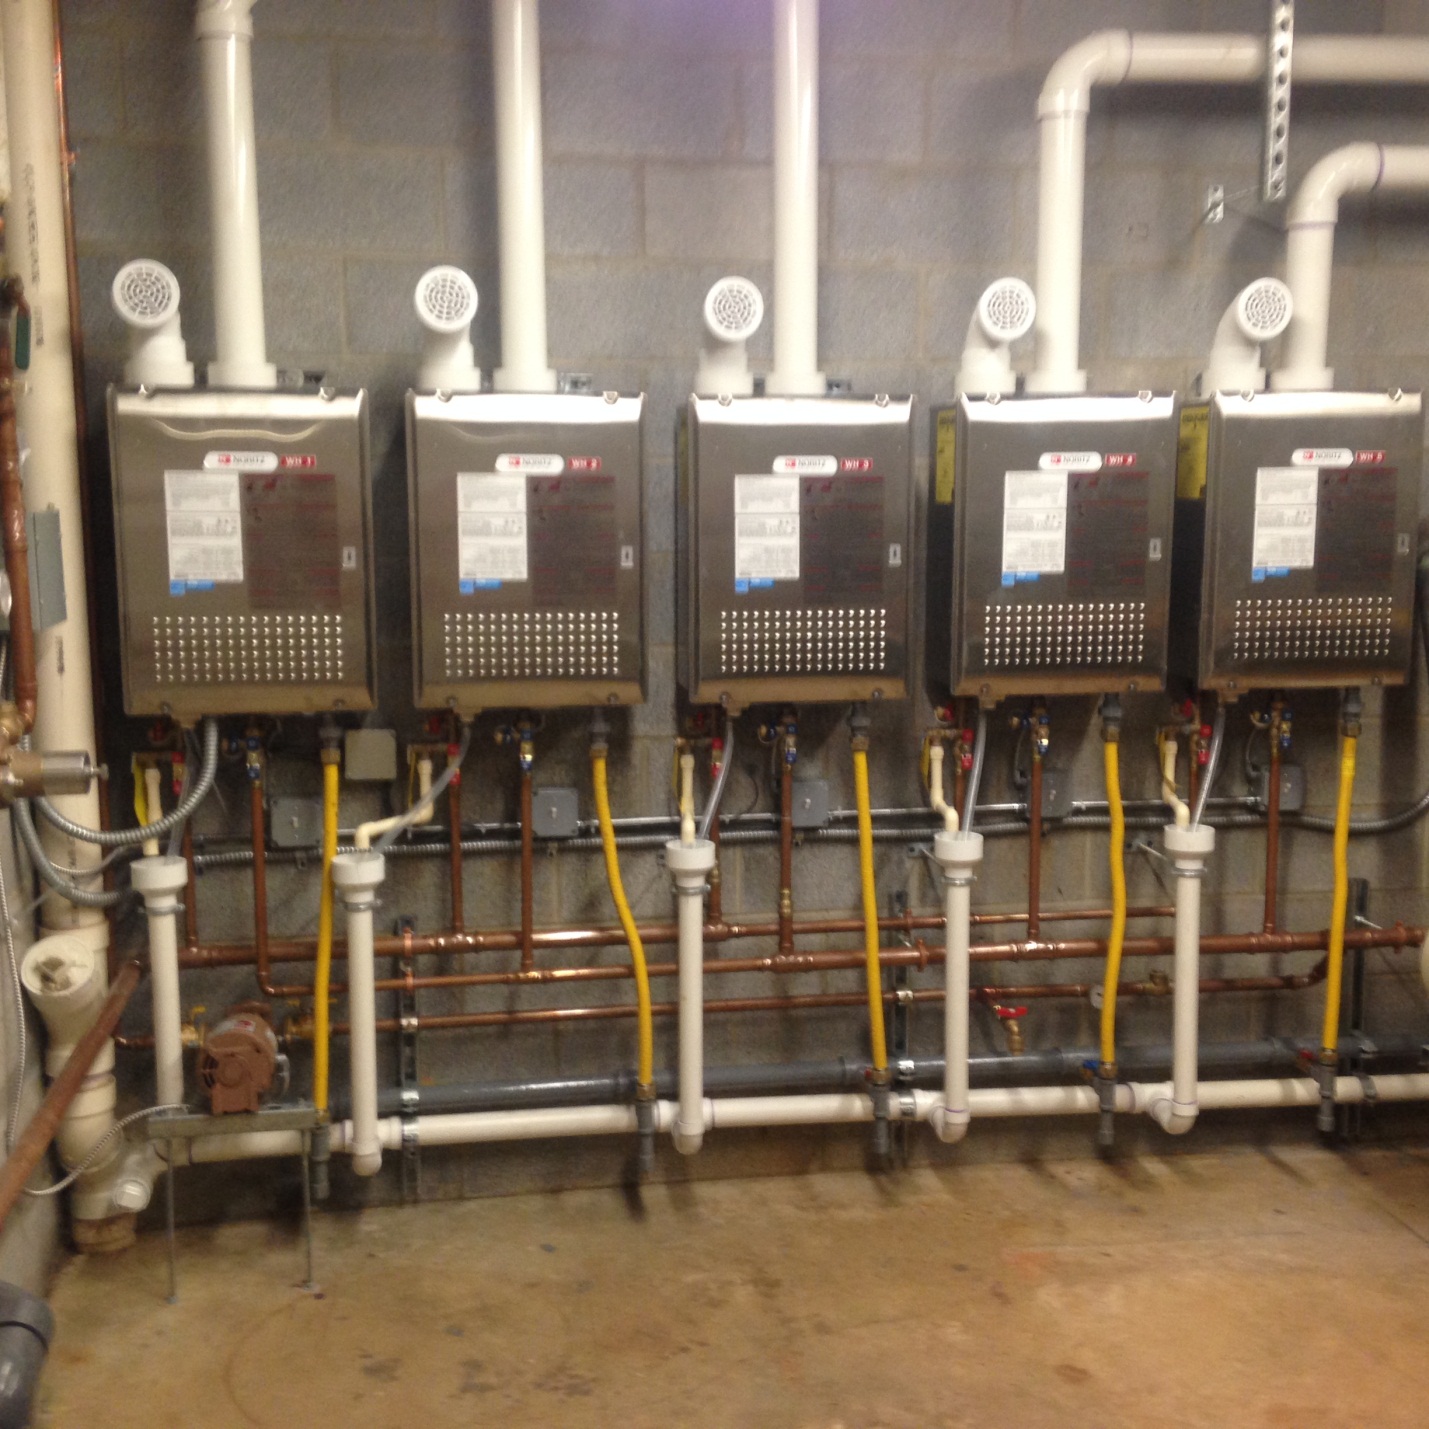
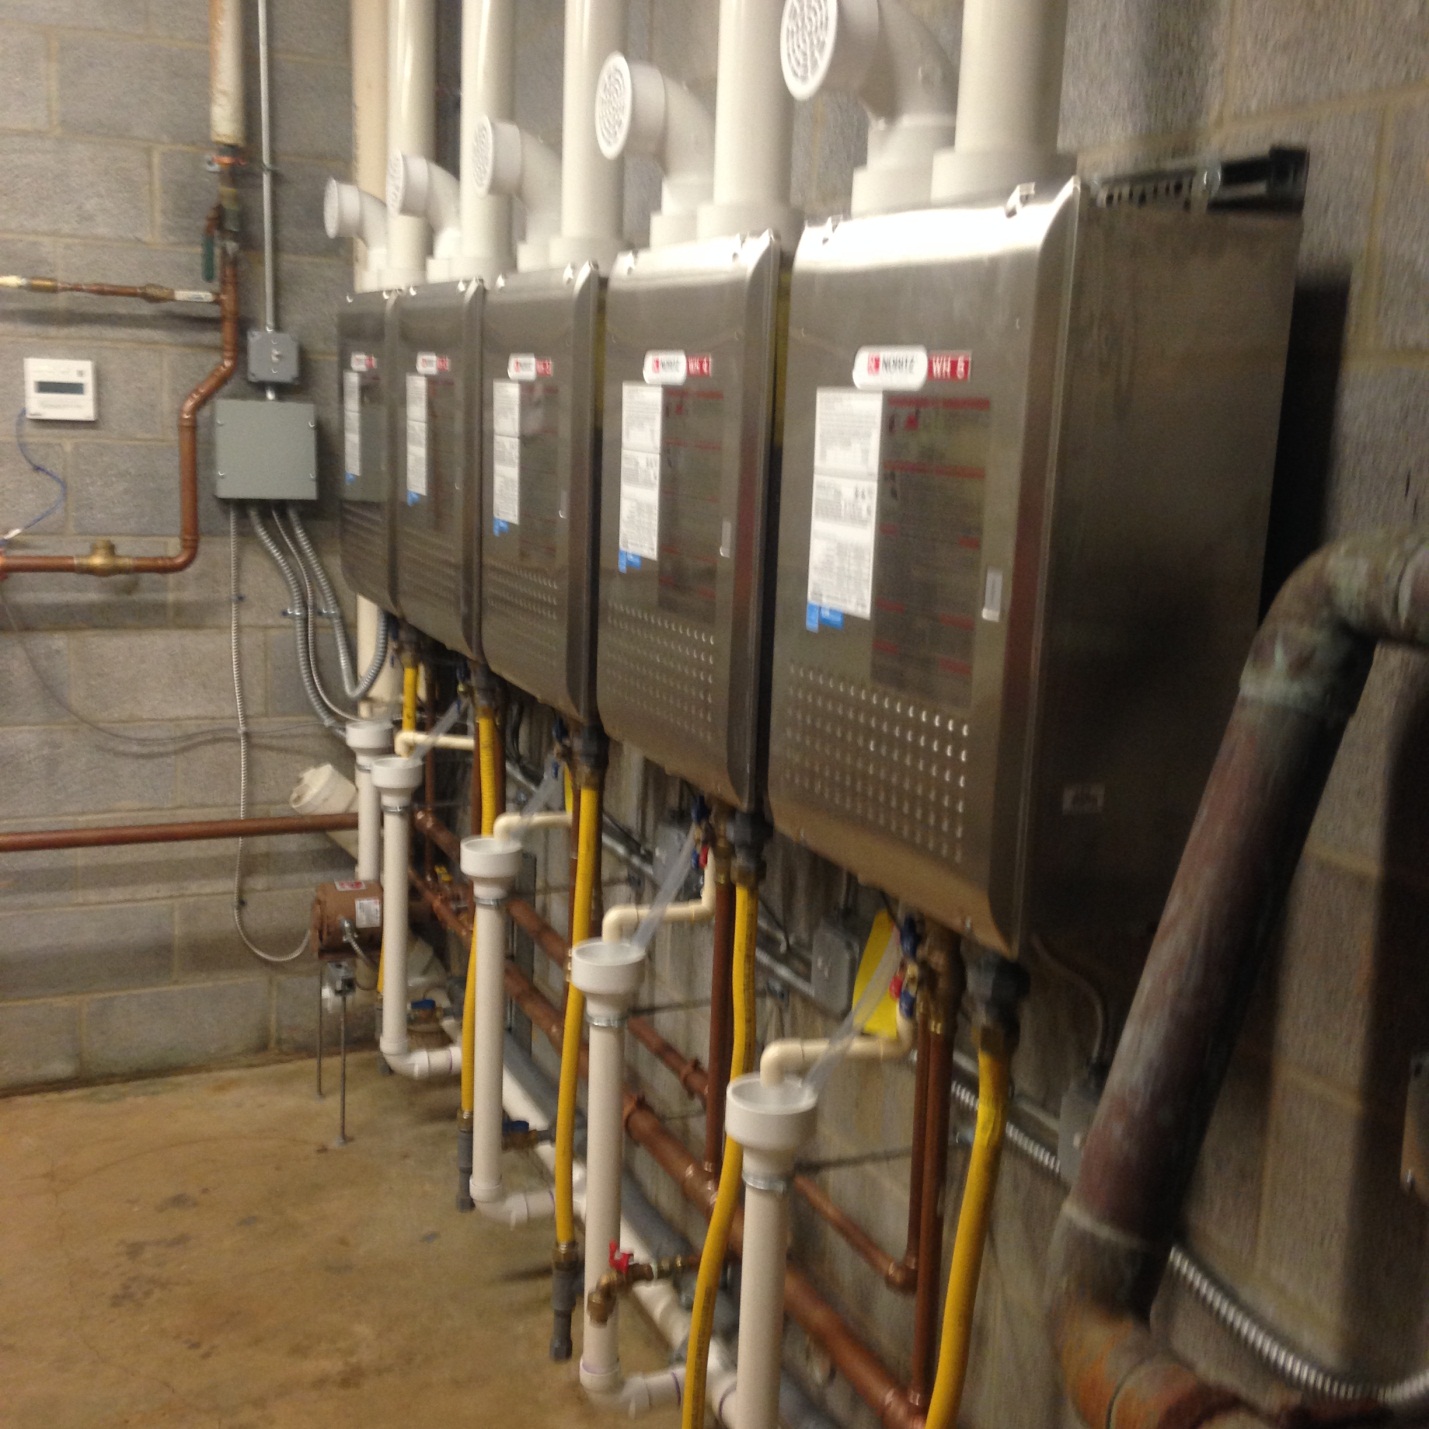
In late June, Apple Plumbing & Heating, Inc. installed a new, high efficient hot water system for The Hill Family Center Y.The following photos and description details the work that was done, the planning that went into it and how this installation helped the Y reduce their carbon footprint.

The old system that the Y of Central Maryland was using consisted of two 80 gallon propane water heaters with a 200 gallon storage tank. This old system had an efficiency of less than 60%.

YMCA WH 1

The Y chose to have us install a new, high efficiency tankless water heating system. This system consists of five 95% efficient propane-fired water heaters with a recirculating pump and integral system controller. We chose Noritz water heaters for their dependability, ease of programming and factory support. Off the bat, we estimate the Hill Family Center Y will burn over 2,500 LESS gallons of propane gas annually. By my research and calculations that is over 31,000 lbs LESS carbon dioxide being emitted into the air each year! The new system has no storage tanks that need to be constantly heated even if no hot water is being used. The heaters only heat water as needed. If no hot water is flowing, the heaters are not burning gas. The system comes with a controller that monitors hot water flow and turns on heaters as needed. If a little hot water is required, only one heater will fire. In addition, each heater modulates its gas usage from 15,000 BTU to 199,000 BTU.

YMCA WH 2

As you can see, the system is compact which reflects its efficiency. Our team of Jordan, Bruce and Luke worked long days for a full week in order to get the Hill Family Center Y back on line with hot water. Jordan spent a full day the week before the job planning out the installation. There was quite a bit of piping installed in a very small space. They had to install gas piping, cold water piping, hot water piping, recirculating piping, condensate piping and flue piping. All in three days. In total, the project took five days. The last two days were spent on electrical wiring and control wiring. Tim Kyle Electric was our subcontractor for the electrical work. His crew was challenged to integrate the new system with old controls and wiring. It took some creative thinking but Tim Kyle Electric, along with Jordan, figured out the sequencing and was able to fire up the system on Friday afternoon to bring the Hill Family Center Y back on line with hot water as promised.

YMCA WH 3

All of us at Apple Plumbing congratulate the Hill Family Canter Y for their commitment to our environment. They chose a system that provides their members with an abundance of hot water while saving energy and decreasing their carbon footprint. Their decision results in a great benefit not only for their organization and members, but to the community they serve. Jordan, Bruce, Luke, and all of us at Apple Plumbing are honored to have been given the responsibility to design and install a high efficient hot water generating system for the Hill Family Center Y. We value the confidence placed in our team and are proud of the product we delivered.

Water Wells 101

Pat Scheper

In our trade, when one mentions “PUMP” we naturally think of a well pump. Today’s topic: Water wells. To define it, a well is simply a deep, skinny hole in the ground from which we pump water.

well

The illustration shows a typical 6” well such as we see in many yards. A well driller drills about an 8” diameter hole in the ground until he hits bedrock. He continues drilling 2 feet into the bed rock. He then inserts 6” steel or plastic casing into the hole until the casing rests on the bedrock. Once this is done, the driller pumps cement-like slurry (a semi-liquid mixture) called grout into the annular space between the casing and the hole up about 30 feet from the bedrock to hold the casing in place for the next phase. A smaller bit that fits into the casing is used to continue drilling into the bedrock. Once sufficient water is found, the drilling process is over. The driller then pumps more grout into the annular space to the surface. In addition to holding the casing in place, the grout hardens and prevents surface water from getting into the well and contaminating the water. Depending on local codes, the well casing will extend about 18” above grade.

What is “sufficient water” you ask? Well, that’s a deep subject (get it… Sorry, I couldn’t resist). Local health departments dictate sufficient water. The following is taken from the Carroll County Health Department web site: • Yield Test: Required of all new wells. Domestic wells must be capable of producing at least 1 gallon per minute. Also, at least once a day, the well must be able to produce 500 gallons in a 2-hour period. Well storage and tank storage is taken into consideration for this requirement. A well yield test must be conducted for a minimum of 3 hours. If after 3 hours, the well has consistently yielded 4 gallons per minute or more, the test may be terminated. If a well yields under 4 gallons, it must be yield tested for a minimum of 6 hours.

Here we go: We have a well that produces 1 gpm. That is 120 gallons in 2 hours. If we need 500 gallons in 2 hours to meet Health Department requirements, then we need 380 gallons storage in the well. At 1½ gallons /ft., we would need approximately a 253’ column of water from the bottom of the well to the static water line. If a well yields 10 gpm (a really great yield) then in 2 hours, it will produce 1,200 gallons! This certainly exceeds the 500 gallon requirement.

There is no minimum depth requirement for a well in Carroll County, although there must be at least 20 feet of casing. I’ve seen some wells in the county less than 100’ deep…they are generally older wells.

Now, there are other types of wells beyond the 6” drilled type we see in our area. BUT you’ll have to stay tuned and check back next week to find out what they are! (I love a good cliffhanger ending).

Back-Up Sump Pumps, Part 2 of 2

Pat Scheper

If you’ve been keeping up with our special “hump Day, Pump Day” series on sump pumps, you’ll remember that we’ve so far discussed sump pumps and their uses, and we’ve moved on to back-up sump pumps. Last Wednesday I went over one type of back-up sump pump with you, the battery-powered back-up. This week, I’ll explore the second type: water-powered back-up sump pumps. How do these work? Well, the pump utilizes a phenomenon know as the “Venturi Effect”. Essentially, CITY water flows through a nozzle in a pipe extending into the pit. The water flowing through the nozzle increases in velocity, thus decreasing pressure in the pipe. This decreased pressure “sucks” water out of the pit. It combines with the city water and is discharged to the exterior. Two bummers with this system: One- you MUST have CITY water. It will operate with a well pump, but if your electric goes off causing your sump pump to not work, the same power outage will cause your well pump to not work also. So, city water it is. Two- same as with the battery pump, the water powered pump will pump about ½ the volume as the primary pump. Again, this is still better than nothing.

I have seen some Do-It-Yourself videos on how to install a water-powered sump pump, and generally here are two rather important installation cautions that are either glossed over or ignored: first, back flow prevention. This pump is connected to your potable water system. It is also immersed in nasty water in your sump. This is known as a cross connection. It is possible for the nasty water to get into your potable water piping and contaminating it. The back flow preventer is designed to prevent this. However, there are varying degrees of cross connection hazard and, thus, various back flow devises. Back flow devises range from a dual check to a Reduced Pressure Zone back flow. Basically, back flow devises are a whole series of blogs that will bore you to tears. Suffice it to say, a back flow preventer is required on a water powered sump pump. My experience is that local codes require a Reduced Pressure Zone type of back flow. This is an expensive piece of equipment and must be tested by a licensed back flow professional. You don’t want to be cavalier about this-call your local plumbing inspector and make you have the proper back flow device installed-whether your hire a plumber or do it yourself.

Second, most installation videos show the discharge pipe from the water powered pump connecting to the discharge pipe of the primary sump pump. Again, check local codes. Some jurisdictions require the discharge pipe to run to the exterior INDEPENDENTLY of each other. Baltimore County, Maryland requires a reduced pressure zone backflow device AND separate discharge piping. Be attentive to the code requirements… they are there for your health and protection.

I trust by now, you’ve got the basic idea of sump pumps and their various back-up options. What do you have? Do you feel secure in the event of pump failure, a power outage and possible flooding? I hope so! Check back next week for an all new pump-related discussion!

Back-Up Sump Pumps: Part 1 of 2

Pat Scheper

On our first “Hump Day-Pump Day” we talked about sump pumps. As we learned, a sump pump is a very necessary item, especially when there are heavy rains. So, what happens when your electric goes out during a storm? Or when your sump pump just fails? Without a functioning sump pump, the rain water will eventually flood your basement. Just a ¼” of water, which is about 156 gallons per 1,000 square feet, can do great damage. It will soak your carpet, into wood molding the bottoms of cardboard storage boxes, furniture legs, etc. So if your sump pump fails to work during a storm, wouldn’t it be comforting and practical to have a back-up system? Fortunately, there are two sump pump specific products on the market that can help you out… This week we’ll look at battery back-up sump pumps.A battery back-up system is a small, secondary pump operated by a 12 volt DC, deep cycle marine battery. It is not intended to be the primary pump, nor can it operate indefinitely under battery power.

back up sump pump

The illustration shown depicts a typical battery back-up sump pump system. The system consists of: • Small 12 volt pump • 12 volt deep cycle marine battery (typically sold separately) • A float switch/alarm • A charger/controller • A battery box • A tee with check valves • Associated wiring

The pump is installed in the sump and connected to the discharge pipe of the primary sump pump. The float/alarm is mounted above the primary pump. The charger controller keeps the battery charged and, on some models, sounds an alarm when the back-up pump kicks on. In addition, on some models, the controller sounds an alarm when the battery charge drops. The system operates in this way: When the primary pump fails, water in the sump rises above the “on” level to the level of the float switch. When the float switch rises it energizes the back-up pump and your basement is saved from drowning. Of course, the battery will eventually use up all of its electrons and the back-up pump stops running. My experience is that a fully charged battery will operate the pump for approximately 8-10 hours, which is plenty of time to have our plumbers out to replace the failed pump or to safely run electric to the pump from an exterior generator. There are some models that use two batteries, thus doubling your running time. Check it out, and check back next week for a (shorter than these first two, I promise!) post on the other type of back-up sump pumps.

Have You Checked THIS Lately?

Pat Scheper

Almost every house has one. It’s generally located in a damp, dark hole in the floor, and most homeowners pay it no attention until they are standing ankle deep in water during a storm. Yup, it’s your sump pump. sump-pump Think of your basement as a reverse swimming pool. Instead of a hole in the ground keeping water in, you have a hole in the ground trying to keep water out. I say trying because most basement structures fail at keeping rainwater and ground water out. The soil around your foundation is very porous and holds water like a sponge during wet times. If your basement is 8’ in the ground, then the wet soil is like having a column of water 8’ high pushing against your foundation wall at your footers. That column of water is equal to 3.5 pounds per square inch (psi). That may not seem like a lot of pressure, but try blowing 3.5 psi on a gauge! A grown man can blow a pressure of about 1.4 psi. So, when it rains, there is a very real chance of water getting into your basement. Various construction methods help direct this rainwater to your sump which is where the sump pump comes in play. A good 1/3 horsepower sump pump will discharge about 44 gallons per minute (gpm) at 10’ of head. What’s that mean?! It means the pump will pump 44 gpm through a vertical pipe 10’ high, which is about the maximum vertical lift for a pump in a buried sump in a basement 8’ in the ground. So, is 44 gpm good? Let’s do some math: Let’s just say you live on an acre of ground. That’s 43,560 ft². And let’s say we get one of those kick a** thunder storms that spring up in the summer (we wouldn’t know anything about this year would we…). This storm dumps an inch of rain in about an hour; a lot of rain to be sure, but not an unreasonable amount for a summer storm. An inch of rain on an acre of ground is 3,630 ft³ of water, and a ft³ of water is equal to 7½ gallons. Your acre of paradise just had 27,225 gallons of water dumped on it! Now, not all of that water is going to be directed to your house and into your basement. Not if your builder did his job in grading and installing rain leaders. But, some of this water makes its way to your house. Let’s say 5% of that 1” of rain is going to get to your foundation and seep in through the foundation. By the way, I have no idea exactly how much will get to your basement, this is a HYPOTHETICAL example. Five percent of 27,225 is about 1,361gallons of water. Now, let’s go back to our sump pump that can pump 44 gpm. That equals 2,640 gallons per hour. That is about double the 1,361 gallons we are assuming is going to get through your foundation wall. So a GOOD 1/3 hp sump pump should be sufficient. We use the Myers MCI033 at Apple Plumbing. It is a nice, solid, cast iron pump with a float rod switch (less likely to hang up in the sump). Other good pumps are Goulds and Zoeller.

You should check your sump pump once a year, or have us check it out. We do this by pouring water in the sump until the pump comes on and observe the rate of discharge. Is it a strong, steady stream or a weak one? Make sure the pump is sitting on a solid base and there is no debris, silt, mud or stone in the sump that could clog up the pump.

That was quite a lot of information, but it really is too late to find out your pump doesn’t work when your basement is flooded!

Stay tuned for next week's post on back up pumps!basement-pool-cartoon

Some Easy Water (and Money!) Saving Tips

Pat Scheper

The Carroll County Board of Commissioners has voted to increase water and sewer rates in order to pay for repairs to our sewer and water systems, which affects a large portion of our customer base. Because of this, I thought now would be an opportune time to remind everyone of a few basic actions we can take to ensure we're not wasting more water and money. These tips can save up to thousands of gallons of water. Potentially thousands of dollars, too. Many small problems can escalate to much larger issues if ignored. Routinely check for leaks. It's spring time, so our outdoor hose bibs (faucets for hoses) are once more being used. Check them for leaks! Do they drip when not in use? When you screw in your hose, does more water pour over the sides than is being funneled through it? The same goes for indoor kitchen and bathroom faucets. Even a small, seemingly inconsequential drip can waste a huge amount of water if it goes ignored for too long.

Check your toilets too. After flushing, make sure they don't continue to run. It's easy to barely notice the sound of a running toilet in the background, or to all of a sudden tune into it and realize it had likely been going for hours. Be aware!

Is your toilet an older model? You may want to consider an upgrade. Newer models use less water to flush, and many are designed specifically to use the least amount possible. You'd be surprised how those extra gallons per flush can add up!

There are other little things that can be done that we've all heard probably dozens of times: turn off the water while brushing your teeth. Wait to run the dishwasher and washing machine until you have full loads of dishes and laundry to clean.


These few, simple tips can conserve water and save you a headache and bigger dent in your wallet.

Vegetable Garden Watering Tips

Pat Scheper

A vegetable garden is a beautiful thing to behold. Plump juicy tomatoes, green beans, corn on the cob, herbs and spices, peppers, onions, cucumbers, squash, zucchini, strawberries, and so on…. Nothing like seeing and tasting your hard work through spring and summer. In our garden we grow an abundance of tomatoes, peppers and onions to make and can our own salsa. This year we added cilantro to our garden for our salsa. We also can tomatoes, corn and green beans. We make our own pickles and put them up too. This year we are raising pumpkins for Sue’s wonderful pumpkin pies in the fall and at our Thanksgiving table. Last year was the first we canned… and we love it. Brings back memories of my mom canning when I was a kid. The smells of tomatoes simmering and corn boiling sent me back to my youth in a flash!! It was a big investment purchasing a water bath canner, a pressure cooker and all the jars. But, boy, opening a jar of tomatoes in January to liven up a pot of soup was worth all the expense and work. Adding a jar of corn to lima beans for succotash at Thanksgiving was warming. Sue had never experienced canning before and she fell in love with it. We spent a great deal of time together in the kitchen putting up the bounty harvested from our garden. In the cold of winter we remembered the hot Saturday in August when we husked dozens of ears of corn in the garage… listening to the Orioles and sipping a cold beer. Great stuff!!

However, all the good vegetables from our garden came at a price: hard work in tilling and weeding, soil supplements in fertilizer, fish emulsion (best stuff on earth!), compost, and water… lots of water. During dry periods your investment in time and money needs protection or your vegetables will not produce well. How much to water is always a guess. Some say ½” per week, others 1” per week. Some vegetables need to be kept consistently moist. Whatever amount you need, you need water. How and when you water can save or waste large amount of water. First, I put a mulch of straw down in my garden when I plant. This serves three purposes for me: It helps to keep weeds down, it helps keep the soil underneath moist, and it looks nice. In the fall I can either use the straw in my compost bin or till it in to decompose in the soil over the winter. One year though, I think I got hay instead of straw… I had some of the best looking grass in my corn rows!! Anyway, back to water. I save plastic gallon milk and water jugs during late winter and early spring. I poke some holes in the bottom and 1/3 up the sides. When I plant a tomato I plant a jug next to it. I bury the jug up to the opening. Once a week I fill the buried jugs and I get water to the roots of my tomatoes. I am putting in 24 tomato plants this year (like I said, we can salsa and tomatoes). They will take up and area of about 420 ft² in my garden. If I used a sprinkler to water each week and put down an inch of water weekly, I could use up to 4,400 gallons of water just for my tomatoes this summer. If I use my jugs I could use as little as 384 gallons. That is less than one tenth the amount of water used with sprinklers!!

Jugs are not very good for corn, beans, cucumbers, etc… You really are left with either drip irrigation or sprinkler. I have not made the investment in a drip irrigation system… one of these days. Until then, I am left with sprinkling. As I said, I use straw to hold the moisture. I also water in the evening so the moisture can get into the soil without the sun evaporating it first. I also keep a rectangular cake pan (one with straight sides) in the garden. I use this to measure how much water I put down (a ½” of water in the pan means I put a ½” in the garden) and how much rain falls during a shower (a ½” of rain in the pan is a ½” I DON’T have to water).

I try to place my sprinklers so I’m not watering the roof of the shed or the soybeans in the field behind my garden. Most of all, I try to not over-water. I just read that more plants die from too much water instead of too little. There you go, enjoy your veggies!

Pat Scheper

Outdoor Water-Saving Tips for Spring!

Pat Scheper

Well it’s taken a while, but it looks like the warm weather is finally on its way! Time to begin prepping our plants, flowers and shrubs for the coming heat. If you’re anything like most of us here in the office, you take great pride in your garden full of vegetables or walkways lined with blooming flowers. This spring and summer let’s also take pride in how much water we save! It’s easy to put out a sprinkler and forget it, or water the plants only to have them bone dry hours later from the sun. Check out some simple water-conservation tips we’ve compiled then get out there and start weeding the flower beds!  

-Use only the amount of water your plants need, when they need it. -Group your plants according to their water needs. This will prevent overwatering some while underwatering others. -For areas with only a few plants or trees, use a handheld hose or watering can. -DON’T drown your plants in water! More plants die from too much water rather than too little. -Before watering, check the soil 2-3 inches down. Only water the plants if soil is actually dry. -If you are using a sprinkler system, use one with an automatic timed shut off, or set an alarm in the house to remind you to go check on it. -Remember to periodically check a timed sprinkler, though, to ensure it is working properly and turning on and off when it should be. And don’t forget to turn off the timer in the event of an unexpected rainfall! -Check the position of your sprinklers- is the water reaching JUST your plants, or is there a lot of extra water being wasted on areas that don’t need it such as a driveway, street or side of the house? (Even if the drops aren’t reaching these areas, make sure to check for unnecessary runoff as well!). -Consider the time of day when watering your plants. More water gets wasted during the middle of the day as it evaporates much more quickly. Try watering in the morning or evening instead. -Find a sprinkler that sends out larger water droplets rather than a fine mist. This will ensure more water gets to your plants and less is evaporated immediately. -Check all of your outdoor faucets (hose bibs) for leaks. A seemingly slow drip can quickly add up to a large amount of wasted water! -Check to make sure your sprinkler head is firmly attached to the hose and that there is no water leaking out between the nozzle and sprinkler. -When possible, avoiding planting anything at the top of a slope or hill in the yard. When watering these plants, much of the water will run down and collect at the foot of the hill rather than staying with the plants.


Do you have any tips or tricks you use? Feel free to share them in the comments section below or on our Facebook page!

EPA Lead Free Laws to Go Into Effect in Maryland Jan 1 2012

Ben Scheper

The Environmental Protection Agency (EPA) will require all plumbing products to meet NSF/ANSI Standard 61 Annex G (NSF 61-G) effective January 1 2014. NSF 61-G is a standard to limit the weighted average lead content of plumbing products to ≤ 0.25% for any plumbing that delivers potable (drinkable) water.

The state of Maryland’s Department of Labor, Licensing, and Regulation has decided to amend the current plumbing code to enforce NSF 61-G two years in advance.

Starting on January 1, 2012, all plumbing systems under the Maryland State Board of Plumbing’s code delivering potable water will be required to meet NSF 61-G.

Most materials used in plumbing are naturally lead free or low lead.  Copper, plastic, stainless steel and chrome are all lead free.  Items containing brass and solder are the most common “leaded” materials.

Many plumbing items that traditionally had a lead content will now be stamped “LF”, “NSF/ANSI Standard 61 Certified”, or “NSF 61” to show they are low lead or lead free.  County and state plumbing inspectors will be looking at these items to verify they meet code requirement during inspections.

All of Apple Plumbing’s technicians and employees have been trained on this new standard and have a copy of the amended code in their company manuals.  If you have any questions regarding the new laws ask your technician or call our office.