Contact Us

Use the form on the right to contact us.

You can edit the text in this area, and change where the contact form on the right submits to, by entering edit mode using the modes on the bottom right. 

4108408118

Apple Blog

Filtering by Category: Pumps

Check Your Sump Pump!

Pat Scheper

A sump pump.  It is one of those household appliances you don’t really think about until it stops working.  It sits in a hole in your basement floor, generally has a lid covering it.  It’s in a remote corner of your basement with boxes of “stuff” piled around it…or shelves built over it.  My sump pump sits in a small closet that stores “stuff” we haven’t used in years.  It is easy to ignore it. There are a few reason why a sump pump system fails….all can result in a flooded basement;

  1. The pump is unplugged.
  2. The pump has failed, burnt up, gave up the ghost, gone kaput…
  3. The float is stuck and can’t rise with the water level to turn on the pump.
  4. The check valve has failed.
  5. The discharge pipe does not direct the water away from the house.
  6. Ice & snow block the discharge pipe.
  7. Power outage

sumppump


The best way to see if the system is working is to test it.

The best method to check sump pump system:

  1. Make sure the sump pump is plugged into a working electrical outlet.
  2. Remove the lid and inspect the sump with a flashlight. Look for debris in the sump.  There should only be the pump and associated pipe in the pit.  Clean out anything else.
  3. Inspect the bottom of the pit. The pump should be sitting on a bed of stone, a cinder block or bricks.  Silt can wash into the sump over time and build up on the bottom of the pit causing the pump to clog.  If you see silt or muck around the base of the pump, you may need to have the sump cleaned out.
  4. Also look for pipes extending into the sump. You may see a couple of black corrugated pipes and a couple of PVC pipes.  Make sure these pipes do not extend into the pit such that they could interfere with the float on the pump.
  5. Once you’ve completed your visual inspection you can actually test the pump. Slowly pour 5 gallons of water into the sump.  Depending on the size of the sump, you may have to pour more than 5 gallons.  As you pour in water the float will rise and activate the pump.  At this point you should see the water level slowly drop and shut the pump off when your float drops back below the shutoff level. If that's not what happens, troubleshoot and repair/replace as needed.
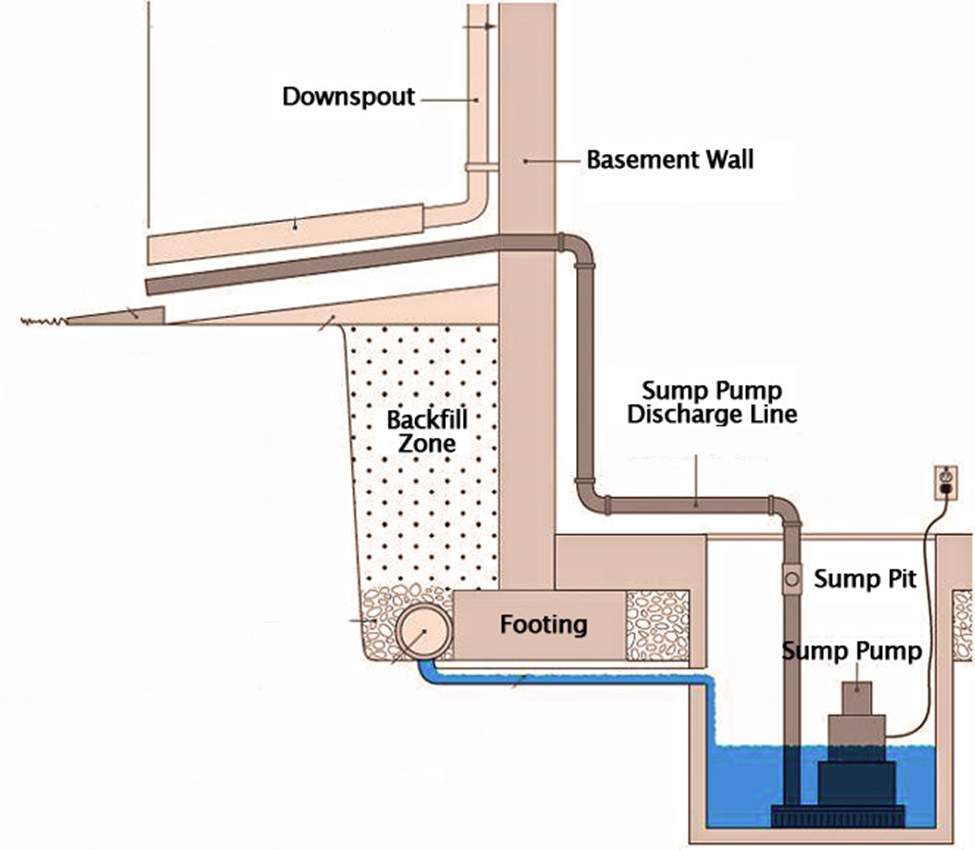
  6. Inspect the discharge pipe outside. You should see water flowing from it when the pump is running.  It should be directed away from the house with a splash block or a pipe extension.  If the pipe is discharging at the foundation wall you will need to make a change.
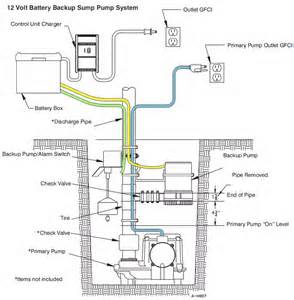
POWER OUTAGE

Your sump pump is needed most during a storm.  However, storms can bring power outages causing the sump pump system to fail.  What to do?  A battery back-up sump pump is just the ticket.  There are a variety of systems to be had with various whistles and bells.  Just remember, on a battery back-up system the pump is smaller than your sump pump meaning is will pump less water. And, the battery will run out of power if the outage is prolonged.  Zoeller Pump Company makes a water powered back up sump pump for houses with a municipal water supply.  They are pretty cool.

If you need help with your sump pump, need it repaired or inspected, call us at 410.840.8118. We'll be glad to help!

Important Reminder!

Pat Scheper

Well well well, the winter snows are officially here! Messy and inconvenient at times, but they sure do make everything look beautiful. Have a sump pump? It may be a good idea to fill it up with buckets of water until it turns on, to ensure it’s working. The last thing you need is for your sump pump to fail in the midst of all this precipitation (melting snow can build up faster than you think!).

Better to proactively check the pump than wait until you need it to find out it doesn't work!

melting-snow-1910

How Does a Well Tank Work?

Pat Scheper

For this blog, let’s dive on in and discuss another type of pump you may have in your home!Your pump tank, or well tank, is the blue steel tank in your home. It is generally in your basement or in a utility closet and has the well pipe from your well pump connected on one side and the cold water main to your house connected on the other side. This is how your pump tank works:

WellTank1
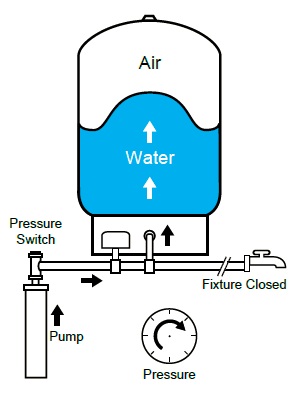
Inside of that tank are two bladders that sit on top of each other. The top bladder is completely sealed and filled with air. The air pressure in the tank varies for the house, but the standard is when the tank has no water in it we pre-charge the air pressure to 38psi. The bottom bladder is a water reservoir that is connected to the plumbing system. When we first turn on the well pump it fills the bottom bladder of the well tank with water. As the tank fills up the top bladder filled with air is contracted and as a result the air pressure builds.

On the outside of a tank there is a pressure switch which measures the amount of pressure in the well tank. When the well pump has filled the tank to the point where the top bladder has contracted to 60 pounds of pressure the pressure switch cuts off electric to the pump and water stops flowing.WellTank1

Let’s now say someone in the home goes to take a shower. When we turn on the water to the house the pump doesn’t immediately turn on but rather the pump tank delivers the first wave of water (pun intended!). When we open up the shower faucet we are literally relieving the pressure from the well tank and the air in the top of the tank pushes the water in the bottom bladder (and the plumbing pipes) out through the shower faucet.

As this happens, the pressure in the tank decreases. When the pressure reaches 40psi the pressure switch sends electric down the pump which turns on and continues pumping water into the plumbing system. When you finish your shower and shut off the water the pump keeps pumping water into the pump tank until it reaches 60psi and then shuts off. The next time you turn on water the process repeats itself and we call that the pump cycle.

A few “fun” pieces of information:

We call the amount of time that a fully charged well tank can deliver water before the pump turns on is called the drawdown time. The larger the reservoir in the bottom of the tank (it varies between about 10 different models of tanks), the greater the drawdown time, the less frequent the pump has to turn on and off to deliver water during its life, which all results in a longer pump life.

We also size well tanks so that the time it takes for a well pump to pump water into a well tank to increase pressure from 40 psi to 60psi is no less than 1 minute (it is a slightly complicated formula that deserves a full lesson on its own)! The reason we need a specific run time is that well pumps motors are designed to run for at least 1 minute before turning off or else it overheats the motor and damages it. A shorter run time is what we call “cycling”. This also occurs when the air bladder ruptures in the top of the tank and the pump turns on every time a faucet opens.


And there ya go, all about your well tank!

All About: Submersible Well Pumps

Pat Scheper

In previous blogs, we have talked about wells and the various plumbing aspects of it, and following in that trend, today we will look at the submersible well pump.The most important, and most obvious, component to a submersible well system is the submersible well pump.

A submersible well pump has two components- the motor and the water end. In general, homes in Central Maryland have well pumps with motors that range from ½ horsepower to 1½ horsepower. The motors are made of stainless steel and are about 4” in diameter and 12”-18” long. On top of the motor sits the water end. Like the motor, it too is comprised of stainless steel and is also approximately 4” in diameter and 12”-18” in length.

Inside the water end is a shaft that is turned by the motor and sticks down into it. Inside the water end and connected to the shaft are a series of impellers that spin as the shaft spins. Finally, in between the motor and the water end is a gap of about 2” that lets water be sucked into the water end.

pump_cutaway 
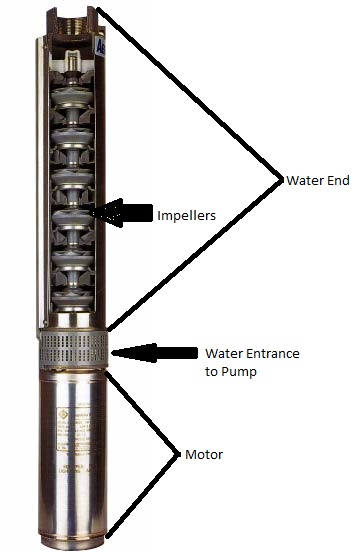
So how does the submersible well pump work?

Well the submersible well pump is connected to a pipe and wire (electric source) and stuck down into the well. The pump sits 10’-20’ off of the bottom of the well to avoid sucking up sediment/dirt in the well. The electric wire coming down the pump is connected to the motors wire and then we melt a plastic tube over the connection to make it water tight.

The pump head is connected to the pipe in the well and secured with clamps so that it doesn’t become disconnected. The wire extends all the way up the well, exits the well casing at the top and is buried underground where it goes into the house to connect to the electric panel and pump controller. The pipe extends all the way up the well casing and exits the well through the side of the casing about 3’ below ground (below the frost level). It exits with a special fitting that is called a pitless adapter. This adapter has 2 parts. The first is on the outside of the well connected to an underground pipe that goes into the house and connects to the plumbing system. The second piece goes inside of the well and is connected to the pipe coming up from the pump.

The two pieces connect to each other through a hole in the well casing, and when connected, form a water tight seal that allows nothing from the outside of the well to enter in and contaminate the system.

Soo… when the well pump is told to turn on the motor spins the shaft and the shaft turns the impellers. The impellers have fins on them so as they turn they create an upward driving force, which sucks water in through the opening between the water end and the motor, which in turn forces the water upwards through the well pipe in the casing. The water goes up the well pipe, through the side of the casing through the pitless adapter, through the underground pipe into the home and into the plumbing system. And just like that, we have water!

So how does the well pump know when to turn on? That is the job of the well tank, which we will discuss in next weeks’ blog.

A Note on Sizing: We mentioned that there are different sized motors and water ends, and we know you are wondering just how we determine the size of each. As we said above, motors come in different horsepowers. Water ends come in different gallons per minute ratings. The more impellers inside of the water end the more water it can pump and the higher gallons per minute rating it receives. They generally range in ratings of 5-25 gallons per minute. Different sized motor and water ends can pump different amounts of water.

To make things more complicated, the amount of water any given pairing can pump also depends on well depth, water levels, distance of a well from the house, well tank size, number of plumbing fixtures and the list goes on.

All of this information is used to look up motor/water end pairings on a series of graphs and charts provided by the manufacturer’s engineers to tell us exactly which well pump we need to install in your well. Simple, we know. But rest assured that all our technicians know how size a well pump and that Apple Plumbing will make sure that all you have to do is turn on the faucet!

Water Softeners

Pat Scheper

Water-softener
Water-softener

The last two blogs have been devoted to hard water and water with high iron content. Both problems have something in common, and that is how they can be resolved. Both hardness and iron are media that need to be removed from your water, and the way that is done is via a water softener.What is a Water Softener? Basically, softeners utilize two tanks and operate using an ion exchange system. The ion replacement takes place in one tank filled with small polystyrene beads, or resin. The beads are negatively charged and are bonded to positively charged sodium ions. As the water flows past the beads, the sodium ions swap places with the calcium and magnesium ions, which carry a stronger positive charge.

In the other tank is salt. After several cycles, calcium and magnesium replace all of the sodium in the beads. When this happens the unit can no longer soften water. To solve this, the softener enters a regeneration cycle during which it soaks the beads in a mixture of water and salt (sodium chloride). The large amount of sodium in the brine causes the calcium, magnesium, and iron ions in the beads to give way and the beads are then recharged with sodium. After this regeneration, the softener flushes the remaining brine as well as the calcium and magnesium down through a drainpipe.

For those on a low sodium diet concerned with the amount of salt your water is flowing through, generally the amount of salt added to your water is very low- generally less than 12.5 milligrams per 8 oz. glass of water; much lower than the Drug and Food Administration’s standard for “very low sodium”, which is less than 35mg of sodium per serving. A “low sodium diet” according to the USDA is less than 1500mg/day, or 120 glasses of softened water! But if sodium is just a deal breaker, there is a company that makes pellets of potassium-chloride that can be used in place of salt.

Standard Water Softener vs. Iron Water Softener. Although we use the same water softening equipment to remove both hardness and iron, there is a slight difference between a system meant to remove just hardness and one meant to remove hardness and iron. An Iron Water Softener uses a smaller, finer resin bead than a standard water softener. This finer resin allows the softener to remove a higher level of iron than the standard resin. A standard softener should only remove a small level of iron whereas the finer resin can remove up to 10ppm of iron. Why not just use the finer resin in all softeners? Simply, it is more expensive, so let’s not spend our hard earned money unless it is necessary!

Advances in Technology A traditional water softener has a time clock head that determines when to rinse off the resin with the brine solution. Basically, a technician takes the level of hardness, asks the homeowner about water usage details, and then makes a calculated guess as to when the softener needs to enter rinse mode because the resin can no longer soften the water. But thanks to modern technology, we now have what we call metered heads.

New softener heads have a meter that measures how many gallons of water have been used during the current cycle. The head is digitally programmed with the hardness level of the water and actually calculates when the resin is full. Once the resin is full the system enters the rinse mode. This saves energy, salt, and water!

And that is everything you wanted (or didn’t want) to know about water softeners!

FAQ: Iron

Pat Scheper

Have questions about the iron content in your water? We've got answers! Q. What exactly is the iron in my water? A. Iron comes in two forms, ferrous and ferric. Ferrous means the iron is dissolved into the water so that the water contains iron but still appears clear. Ferric iron results when ferrous iron has been exposed to oxygen and oxidizes, which causes the iron to then separate from the water and become a suspended matter, much like sediment.


Q. How is it measured? A. Both ferrous and ferric iron is measured in parts per million, or PPM. The industry standard is that iron levels of over 0.2 ppm in a water system should be addressed and treated.


Q. How does it get into our water? A. As iron is found in deposits in the ground, water readily dissolves it as it passes through them in its underground flow into our water sources. It can also result from the corrosion of pipes and your various plumbing systems.

iron_pics

Q. What can iron do to a home and plumbing system? A. In the home, both ferrous and ferric iron show themselves by leaving hard-to-remove yellow or reddish-brown stains on fixtures, anything porcelain and cooking utensils. They can also leave similar stains on clothing in the laundry. Water high in iron also has that distinctive metallic taste to it. To your plumbing system, ferric iron acts similar to sediment/hardness and can contribute to the formation of clogs in pipes, wells and pumps among other systems.


Q. How are high iron levels reduced from water? A. Stay tuned to see the answer to this, and last week’s question on removing hardness from water in next week’s blog!

What Is "Hard Water"?

Pat Scheper

That’s a good question. Simply, the hardness of water refers to the level of dissolved minerals, most commonly calcium or magnesium, found in the water. These minerals are the result of your water passing through limestone deposits in the ground before the water makes its way into your water system and eventually out your faucets. The more limestone between ground level and the water supply, the higher the hardness levels will be. Though city water can be hard, hardness is especially present in well water, where water falls to the earth and filters through the surface down to aquifers or the water table from which well pumps draw water.

Water hardness is generally measured in grains per gallon (gpg). GPG refers to, just as it sounds, the number of grains of a given substance in one gallon of water. One grain is equal to 1/7000 lb. and one gallon of water equals 8.33 lbs. The guideline typically used for measuring hardness levels in residential water is as follows; 0.0-0.9 gpg=soft water, 1.0-3.9 gpg= slightly hard water, 4.0-7.0= moderately hard water, and 7.1-12.0 gpg= hard water. A level of over 12.0 gpg is considered very hard water.

One thing to keep in mind is that having hard water is NOT dangerous or detrimental in any way to your health. It can and does, however, cause problems both to your plumbing system and in your home. Hard water reacts to soaps and detergents and forms a “scum” rather than allowing the soap to lather and do its job. This presents a problem when doing laundry, cleaning the house, and yes, cleaning yourself. It can cause clothing colors to dull and white fabric to appear yellow or grey, shortens the life of fabrics in general, causes soap scum rings in your bathtub, streaks glassware and dishes and prevents the soap and shampoo you use from lathering up as well as they should when showering. On their own, each of these can seem like a minor nuisance.

But put them all together and combine them with what hard water can do to your plumbing system and suddenly it’s not such a small problem!

hardness
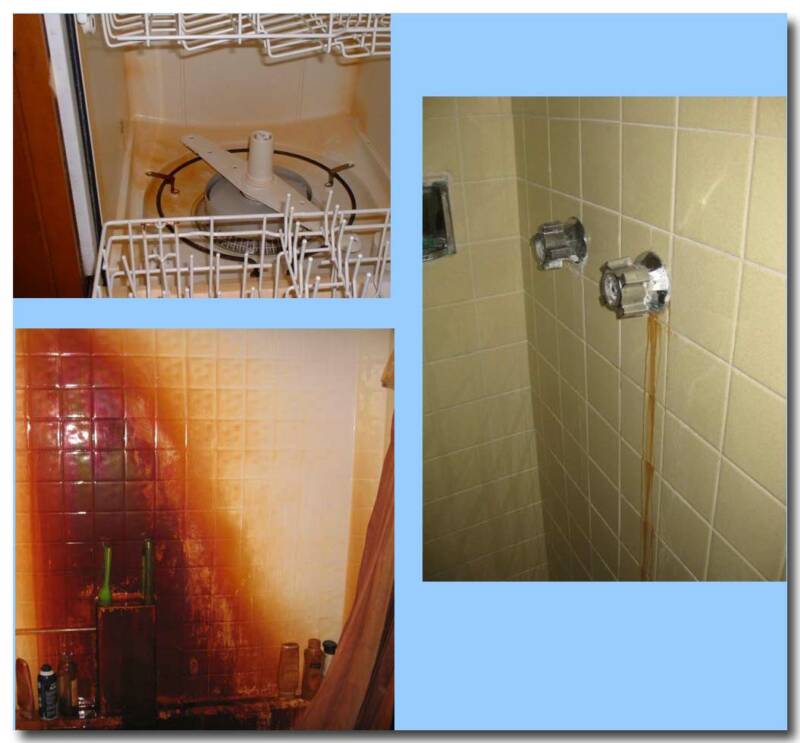
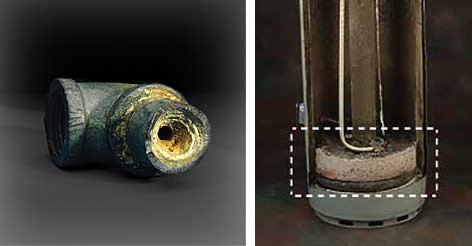
Hard water builds up and forms deposits that clog up your pipes. These deposits, of course, restrict the flow of your water and can corrode pipes, dishwashers and washing machines as well as the various pieces of plumbing equipment you have in your home. Maybe most importantly, hard water causes scale and sediment buildup in your water heater (as pictured in the second image) decreasing heating efficiency, gallon capacity, and the life expectancy of the water heater.

If hard water is such a problem, how do we get rid of it? Stay tuned…!

Acid in Well Water

Pat Scheper

In a previous post we talked about water quality as it pertains to human consumption. However, water chemistry that is not harmful to humans can really be destructive to your plumbing system. One aspect of water chemistry is acid. First, a little refresher on high school chemistry. What do the letters “pH” stand for….and why is the H capitalized? pH is an abbreviation for "power of hydrogen" where "p" is short for the German word for power, potenz and H is the element symbol for hydrogen. The H is capitalized because it is standard to capitalize element symbols. The abbreviation also works in French, with pouvoir hydrogen translating as "the power of hydrogen".

pH is the measure of the acidity or the basicity of an aqueous solution. An aqueous solution is a solution in which the solvent is water. It is water with stuff dissolved in it. So, a cup of coffee with sugar is an aqueous solution. Solutions with a pH of less than 7 are said to be acidic, solutions with a pH greater than 7 are said to be basic or alkaline. Pure water has a pH of 7.

PH_Scale.svg

The pH scale is logarithmic. WHAT?! Yes, those mind numbing logarithm problems from high school algebra do have a real world application. The only thing I have to say about the acid logarithmic scale is that it is exponential and has a base of 10. So, tomato juice (pH of 4) is 10 times more acidic than Black coffee (pH of 5). If you want to know more about the pH scale and logarithms (in which case I’d question your sanity) you can look it up on Wikipedia. Or dust off your old Algebra 2 textbook.

Okay, so how does our well water become acidic? Remember the term “Acid Rain”? There you go-that’s how. When rain falls to the earth, carbon dioxide in the air is dissolved by the rain creating an aqueous solution of water and carbonic acid. This solution seeps into the ground, into aquifers, and eventually into your well. Limestone is a naturally occurring mineral that is able to eliminate acid from water. So if the ground your rain water passes through contains no limestone you will have very acidic water, a solid limestone layer under the ground will remove the acid and give you neutral water, and everywhere in between.

Acidic water is corrosive. That is to say, it causes pinholes in copper water piping, causes water heater and well water tanks to get leaks, prematurely deteriorates faucets, and generally destroys plumbing systems. You may notice blue-green stains on porcelain fixtures (toilets, sinks, etc…). This staining is copper from piping and fittings that has been dissolved into the water from the acidity of the water. Dissolving copper causes weakness in the piping eventually creating pinholes.

How do you raise your pH if you water doesn't naturally pass through a layer of limestone? Read our next blog: How to Eliminate Acid in Your Home’s Water.

Bacteria in Well Water

Pat Scheper

waterIt almost goes without saying, we need water to live. Depending on the situation, a person can die from dehydration in a matter of hours, days at the most. I believe that, next to air, water is our most basic need. So it stands to reason that the water we drink needs to be clean, free of harmful chemicals and bacteria, and taste good. To that end, you should be certain your water quality is suitable for healthy consumption and cooking. If you have municipal water, the quality of your water is regulated by the EPA-Safe Drinking Water Act (SWDA) . Created in 1974, it sets the standards for water quality for public consumption. So, if you have City Water, it is pretty safe to assume that it is suitable for human consumption.

Since this is Hump Day Pump Day, and we have been talking about wells, how do you know that the water you are pumping out of the ground is safe for your consumption? The short and probably smart-alecky answer is that if you aren’t getting sick, it’s probably okay to drink! Yes and no. I have seen wells that have bacteria in them and the residents are drinking the water with no ill effects. Yet, once they see there are bacteria in the water, they immediately take steps to get rid of it. Generally, two bacteria tests are performed on wells: E. coli and Total Coliform. E. coli is always bad… it’s an indicator of fecal matter in the well. Total Coliforms include bacteria that are found in the soil, in water that has been influenced by surface water and in human or animal waste. Total coliform counts give a general indication of the sanitary condition of a water supply. In a well, a Total Coliform reading indicates ground water is getting into the well. The New York State Health Department has a great web page explaining BACTERIA IN DRINKING WATER; far better than I can do. Here in Carroll County we see a fair number of wells with Nitrates. This is a result of ours being a farming county with an abundance of fertilizers having been used in the past. The EPA has set the Maximum Content Level (MCL) of Nitrates to be 10 ppm (parts per million). So, you can have a Nitrate level of 4 ppm and your water is safe or a level of 14 ppm and not meet EPA standards. See what I mean by yes and no?

There is also this thing called Turbidity. Again, the EPA does a nice job explaining TURBIDITY. To me, Turbidity is like Entropy- I know what it is, but have a hard time explaining it.

So, is your well contaminated with bacteria or nitrates… or both? Is the Turbidity a reason for concern? Only one way to find out: Have Your Water Tested. Two ways to have this done: 1. Call your local health department. In Carroll County, the health department will take a sample and test your water… for a fee. 2. Call a health department certified testing lab. We use FOUNTAIN VALLEY ANALYTICAL LAB. Their prices are very reasonable and the staff very helpful.

How often should you have your well water tested? The EPA recommends annually. That’s a good idea.

Bacteria and Nitrates aren’t the only substances that can contaminate a well. A good source to find out what else can be out there is EPA-Current Drinking Water Regulations.

Next week let’s look water quality that isn’t necessarily harmful to your health, but can wreak havoc with your plumbing system.

What Is A Submersible Well Pump?

Pat Scheper

Glad you asked!

So, last week I said we'd spend a little time on water quality. That can be a rather long subject to talk about and I was informed this morning that I tend to be long-winded in these blogs. So, in the interest of brevity, I'll postpone the water quality volume for a week and briefly talk about submersible pumps. To wit:


submirsible wp

This is a submersible well pump.


Have a great week!

Pat Scheper


Water Wells 102

Pat Scheper

Let’s jump right back in where we left off last week. If you missed it, I highly recommend you checking out last week’s blog entitled “Water Wells 101”. I gave an overview of wells, how they work and what they do. I mentioned there are different types but left you all in suspense. Well here we are, at the exciting conclusion to a two-part nail-biter of a blog miniseries! Read on! One type of well are called DRIVEN wells-a small diameter pipe with a screened well point on the bottom is driven in the ground. These wells are relatively simple and economical to construct, but they can tap only shallow water and are easily contaminated from nearby surface sources because they are not sealed with grouting material. Hand-driven wells usually are only around 30 feet deep; machine-driven wells can be 50 feet deep or more. We see these wells in areas with a high water table such as the Eastern Shore.

And there are hand dug wells. Historically, dug wells were excavated by hand shovel to below the water table until incoming water exceeded the digger’s bailing rate. The well was lined with stones, bricks, tile, or other material to prevent collapse, and was covered with a cap of wood, stone, or concrete tile. Because of the type of construction, bored wells can go deeper beneath the water table than can hand-dug wells. Dug and bored wells have a large diameter and expose a large area to the aquifer. These wells are able to obtain water from less-permeable materials such as very fine sand, silt, or clay. Disadvantages of this type of well are that they are shallow and lack continuous casing and grouting, making them subject to contamination from nearby surface sources, and they go dry during periods of drought if the water table drops below the well bottom. There are still some active hand dug wells around. We have a customer with a dug well that is about 8’ in diameter and 60’ or so deep. It is lined with stone and their pump just hangs in the water; it’s a little scary to work on that well. Years ago, my dad had a customer in Randallstown with a hand dug well. According to the homeowner, it had been hand-dug by slaves in 1850. It was about 30’ deep, 5’ in diameter and lined with some of the most beautiful stonework you’d ever see. That well continuously produced water…never went dry. Unfortunately, the homeowner passed away, the property sold and the well filled in. I think it was a historical artifact.

So, there you go: a brief lesson on wells. Before we get into well pumps, I think we’ll talk a little about well water quality next week.

Until then, GO ORIOLES!

Water Wells 101

Pat Scheper

In our trade, when one mentions “PUMP” we naturally think of a well pump. Today’s topic: Water wells. To define it, a well is simply a deep, skinny hole in the ground from which we pump water.

well

The illustration shows a typical 6” well such as we see in many yards. A well driller drills about an 8” diameter hole in the ground until he hits bedrock. He continues drilling 2 feet into the bed rock. He then inserts 6” steel or plastic casing into the hole until the casing rests on the bedrock. Once this is done, the driller pumps cement-like slurry (a semi-liquid mixture) called grout into the annular space between the casing and the hole up about 30 feet from the bedrock to hold the casing in place for the next phase. A smaller bit that fits into the casing is used to continue drilling into the bedrock. Once sufficient water is found, the drilling process is over. The driller then pumps more grout into the annular space to the surface. In addition to holding the casing in place, the grout hardens and prevents surface water from getting into the well and contaminating the water. Depending on local codes, the well casing will extend about 18” above grade.

What is “sufficient water” you ask? Well, that’s a deep subject (get it… Sorry, I couldn’t resist). Local health departments dictate sufficient water. The following is taken from the Carroll County Health Department web site: • Yield Test: Required of all new wells. Domestic wells must be capable of producing at least 1 gallon per minute. Also, at least once a day, the well must be able to produce 500 gallons in a 2-hour period. Well storage and tank storage is taken into consideration for this requirement. A well yield test must be conducted for a minimum of 3 hours. If after 3 hours, the well has consistently yielded 4 gallons per minute or more, the test may be terminated. If a well yields under 4 gallons, it must be yield tested for a minimum of 6 hours.

Here we go: We have a well that produces 1 gpm. That is 120 gallons in 2 hours. If we need 500 gallons in 2 hours to meet Health Department requirements, then we need 380 gallons storage in the well. At 1½ gallons /ft., we would need approximately a 253’ column of water from the bottom of the well to the static water line. If a well yields 10 gpm (a really great yield) then in 2 hours, it will produce 1,200 gallons! This certainly exceeds the 500 gallon requirement.

There is no minimum depth requirement for a well in Carroll County, although there must be at least 20 feet of casing. I’ve seen some wells in the county less than 100’ deep…they are generally older wells.

Now, there are other types of wells beyond the 6” drilled type we see in our area. BUT you’ll have to stay tuned and check back next week to find out what they are! (I love a good cliffhanger ending).

Back-Up Sump Pumps: Part 1 of 2

Pat Scheper

On our first “Hump Day-Pump Day” we talked about sump pumps. As we learned, a sump pump is a very necessary item, especially when there are heavy rains. So, what happens when your electric goes out during a storm? Or when your sump pump just fails? Without a functioning sump pump, the rain water will eventually flood your basement. Just a ¼” of water, which is about 156 gallons per 1,000 square feet, can do great damage. It will soak your carpet, into wood molding the bottoms of cardboard storage boxes, furniture legs, etc. So if your sump pump fails to work during a storm, wouldn’t it be comforting and practical to have a back-up system? Fortunately, there are two sump pump specific products on the market that can help you out… This week we’ll look at battery back-up sump pumps.A battery back-up system is a small, secondary pump operated by a 12 volt DC, deep cycle marine battery. It is not intended to be the primary pump, nor can it operate indefinitely under battery power.

back up sump pump

The illustration shown depicts a typical battery back-up sump pump system. The system consists of: • Small 12 volt pump • 12 volt deep cycle marine battery (typically sold separately) • A float switch/alarm • A charger/controller • A battery box • A tee with check valves • Associated wiring

The pump is installed in the sump and connected to the discharge pipe of the primary sump pump. The float/alarm is mounted above the primary pump. The charger controller keeps the battery charged and, on some models, sounds an alarm when the back-up pump kicks on. In addition, on some models, the controller sounds an alarm when the battery charge drops. The system operates in this way: When the primary pump fails, water in the sump rises above the “on” level to the level of the float switch. When the float switch rises it energizes the back-up pump and your basement is saved from drowning. Of course, the battery will eventually use up all of its electrons and the back-up pump stops running. My experience is that a fully charged battery will operate the pump for approximately 8-10 hours, which is plenty of time to have our plumbers out to replace the failed pump or to safely run electric to the pump from an exterior generator. There are some models that use two batteries, thus doubling your running time. Check it out, and check back next week for a (shorter than these first two, I promise!) post on the other type of back-up sump pumps.