Contact Us

Use the form on the right to contact us.

You can edit the text in this area, and change where the contact form on the right submits to, by entering edit mode using the modes on the bottom right. 

4108408118

Apple Blog

Filtering by Category: Plumbing

How To Remove Acid From Your Well Water

Pat Scheper

neutralizer

A few posts ago we talked about acid in your well water and the damage it can cause to your plumbing system- check it out if you missed it the first time around or need a refresher. So, how then do we get rid of that acid? Quite simply, we install an acid neutralizer. Remember that rain picks up carbon dioxide from the air and forms carbonic acid. If the rain water passes through a layer of limestone in the ground, the acid is “removed”, or rather, it is neutralized. A neutralizer acts like the layer of limestone. It is a tank filled with crushed limestone called Calcite. Water passes through the calcite dissolving some of it which raises the pH of the water.

Calcite, being an alkaline mineral, neutralizes the low pH acid water, much like adding hot water to cold in order to get warm water. The diagram to the left is of an automatically backwashing neutralizer. When water flows down over the calcite, it tends to pack the mineral causing restriction of flow (low pressure). In addition, the calcite tends to catch some sediment that is in the water. Periodically (about every 4-6 days) the system will backwash (flush) itself. Water flow is reversed and lifts the calcite so as to “fluff” it up, and captured sediment is flushed out. The water used for this process is washed down a drain.

In some cases where the pH is very low, we mix magnesium-oxide with the calcite creating a “super mix”. Also, depending on the pH and the size of the plumbing system, larger neutralizer tanks will be used.

Now, there is another type of calcite neutralizer-The Up Flow Neutralizer:

upflow neutralizer
upflow neutralizer

In this piece of equipment water flows down the center of the tank through a tube and UP through the calcite. There is no backwashing. The constant flow of water keeps the calcite “fluffed up”. However, the downside is that sediment will gather in the stone bed and the calcite causing the need for periodic re-bedding. Personally, I like the automatic back wash. However, the up flow is more economical, so if money is tight, this can be the way to go.

Both types of neutralizers need annual servicing. The calcite dissolves and needs replenishment.

Finally, there is one more type of neutralizer: The Soda Ash or Chemical Feed Pump system. This system is used for a very low pH or for water that has a high level of dissolved solids. This system pumps a solution of soda ash and water into the water before it enters the well water tank. It is very high maintenance and rather noisy. But, if you need one, you need one.

Thanks for reading- contact us with any further questions on this topic and check back next week for a new entry!

Water Quality- Total Dissolved Solids

Pat Scheper

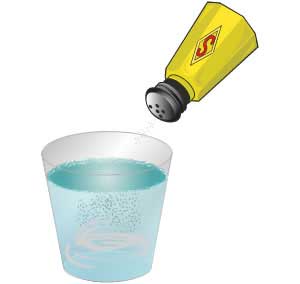
There are many different components of water quality. While acidity, bacteria and hardness are among the better known, inside the trade one of the key components to water quality is something called Total Dissolved Solids (TDS). TDS is the measurement of the combined amount of organic and inorganic matter contained in water and it is measured in parts per million (ppm). The key here is that the matter is dissolved, which means that the matter has become part of the water.saltintowater TDS is like putting salt into water, as you add the salt it disappears into the water. Pure water would have a TDS of 0ppm. Typical well systems have a TDS anywhere from 50 to 940ppm (our office’s personal record). On average, our customers well water TDS is 150-250ppm.

What makes up TDS in water is generally not known without a laboratory doing a very thorough test on a water sample. TDS can be anything from the chlorine/fluorine cities put into water to minerals dissolved into the water while it is underground to nitrates from fertilizer on wells that are near farms. It is really just a numeric amount of the overall “stuff” that has dissolved into your water. There are always exceptions to the rule, but generally you cannot conclude that a TDS of 500ppm is more of a concern than a TDS of 150ppm. It just depends on what has dissolved into the water to raise the TDS. But the TDS test does not tell us what has dissolved into the water, just how much. Figuring out if part of the TDS is harmful would need to be determined by a separate test, such as chlorine, bacteria, or hardness test. In the rare case your water is making you sick, a laboratory test would be needed. But those are all separate well water issues!

So why are we talking about TDS if it doesn’t indicate harmful substances in your water? Water can only dissolve so much matter before it becomes “full”. Once water becomes “full” any additional matter added to it will not dissolve and just become suspended in the water. Add a tablespoon of salt to a cup of water and it will dissolve. Keep adding salt, however, and eventually the water will not be able to handle any more and the salt will just pile up on the bottom of the glass. The same thing can happen with well water when trying to treat it. Systems such as sediment filters and UV lights remove the “bad components” from the water. But systems such as acid neutralizers and carbon filters dissolve “good components” into water in order to eliminate (or neutralize) the “bad components”. We refer to these “good components” as a sacrificial media, meaning they become depleted as they treat the water. If water has too high a TDS, it becomes difficult to dissolve those good components into the water and special sacrificial media or equipment is needed.

TDS is also used to figure out if certain equipment is working. Equipment such as reverse osmosis systems take out a very wide range of dissolved minerals/organic material in water to give homeowners nearly purified water. On these systems, if the treated water has a much lower TDS than the raw water, we know the equipment is working even if we don’t know what exactly it is removing.

How high of a TDS is too high? Well that depends. Water has the ability to dissolve different levels of matter. For instance, water has trouble dissolving calcite (the standard media in a neutralizer) once the TDS is above 600ppm. Magnesium oxide is a much more potent (and expensive) media to add to a neutralizer but does not have a problem being absorbed by water, even with a TDS well over 600ppm. That is why treating water is so much fun! Every water quality test results in different factors that we must take into account when determining which equipment is right (or wrong) for a plumbing system. TDS may not be as damaging as acid, but if it is ignored it can certainly make water treatment equipment ineffective. Check back next week as we explore what a neutralizer is and how it works!

Acid in Well Water

Pat Scheper

In a previous post we talked about water quality as it pertains to human consumption. However, water chemistry that is not harmful to humans can really be destructive to your plumbing system. One aspect of water chemistry is acid. First, a little refresher on high school chemistry. What do the letters “pH” stand for….and why is the H capitalized? pH is an abbreviation for "power of hydrogen" where "p" is short for the German word for power, potenz and H is the element symbol for hydrogen. The H is capitalized because it is standard to capitalize element symbols. The abbreviation also works in French, with pouvoir hydrogen translating as "the power of hydrogen".

pH is the measure of the acidity or the basicity of an aqueous solution. An aqueous solution is a solution in which the solvent is water. It is water with stuff dissolved in it. So, a cup of coffee with sugar is an aqueous solution. Solutions with a pH of less than 7 are said to be acidic, solutions with a pH greater than 7 are said to be basic or alkaline. Pure water has a pH of 7.

PH_Scale.svg

The pH scale is logarithmic. WHAT?! Yes, those mind numbing logarithm problems from high school algebra do have a real world application. The only thing I have to say about the acid logarithmic scale is that it is exponential and has a base of 10. So, tomato juice (pH of 4) is 10 times more acidic than Black coffee (pH of 5). If you want to know more about the pH scale and logarithms (in which case I’d question your sanity) you can look it up on Wikipedia. Or dust off your old Algebra 2 textbook.

Okay, so how does our well water become acidic? Remember the term “Acid Rain”? There you go-that’s how. When rain falls to the earth, carbon dioxide in the air is dissolved by the rain creating an aqueous solution of water and carbonic acid. This solution seeps into the ground, into aquifers, and eventually into your well. Limestone is a naturally occurring mineral that is able to eliminate acid from water. So if the ground your rain water passes through contains no limestone you will have very acidic water, a solid limestone layer under the ground will remove the acid and give you neutral water, and everywhere in between.

Acidic water is corrosive. That is to say, it causes pinholes in copper water piping, causes water heater and well water tanks to get leaks, prematurely deteriorates faucets, and generally destroys plumbing systems. You may notice blue-green stains on porcelain fixtures (toilets, sinks, etc…). This staining is copper from piping and fittings that has been dissolved into the water from the acidity of the water. Dissolving copper causes weakness in the piping eventually creating pinholes.

How do you raise your pH if you water doesn't naturally pass through a layer of limestone? Read our next blog: How to Eliminate Acid in Your Home’s Water.

Bacteria in Well Water

Pat Scheper

waterIt almost goes without saying, we need water to live. Depending on the situation, a person can die from dehydration in a matter of hours, days at the most. I believe that, next to air, water is our most basic need. So it stands to reason that the water we drink needs to be clean, free of harmful chemicals and bacteria, and taste good. To that end, you should be certain your water quality is suitable for healthy consumption and cooking. If you have municipal water, the quality of your water is regulated by the EPA-Safe Drinking Water Act (SWDA) . Created in 1974, it sets the standards for water quality for public consumption. So, if you have City Water, it is pretty safe to assume that it is suitable for human consumption.

Since this is Hump Day Pump Day, and we have been talking about wells, how do you know that the water you are pumping out of the ground is safe for your consumption? The short and probably smart-alecky answer is that if you aren’t getting sick, it’s probably okay to drink! Yes and no. I have seen wells that have bacteria in them and the residents are drinking the water with no ill effects. Yet, once they see there are bacteria in the water, they immediately take steps to get rid of it. Generally, two bacteria tests are performed on wells: E. coli and Total Coliform. E. coli is always bad… it’s an indicator of fecal matter in the well. Total Coliforms include bacteria that are found in the soil, in water that has been influenced by surface water and in human or animal waste. Total coliform counts give a general indication of the sanitary condition of a water supply. In a well, a Total Coliform reading indicates ground water is getting into the well. The New York State Health Department has a great web page explaining BACTERIA IN DRINKING WATER; far better than I can do. Here in Carroll County we see a fair number of wells with Nitrates. This is a result of ours being a farming county with an abundance of fertilizers having been used in the past. The EPA has set the Maximum Content Level (MCL) of Nitrates to be 10 ppm (parts per million). So, you can have a Nitrate level of 4 ppm and your water is safe or a level of 14 ppm and not meet EPA standards. See what I mean by yes and no?

There is also this thing called Turbidity. Again, the EPA does a nice job explaining TURBIDITY. To me, Turbidity is like Entropy- I know what it is, but have a hard time explaining it.

So, is your well contaminated with bacteria or nitrates… or both? Is the Turbidity a reason for concern? Only one way to find out: Have Your Water Tested. Two ways to have this done: 1. Call your local health department. In Carroll County, the health department will take a sample and test your water… for a fee. 2. Call a health department certified testing lab. We use FOUNTAIN VALLEY ANALYTICAL LAB. Their prices are very reasonable and the staff very helpful.

How often should you have your well water tested? The EPA recommends annually. That’s a good idea.

Bacteria and Nitrates aren’t the only substances that can contaminate a well. A good source to find out what else can be out there is EPA-Current Drinking Water Regulations.

Next week let’s look water quality that isn’t necessarily harmful to your health, but can wreak havoc with your plumbing system.

Water Wells 102

Pat Scheper

Let’s jump right back in where we left off last week. If you missed it, I highly recommend you checking out last week’s blog entitled “Water Wells 101”. I gave an overview of wells, how they work and what they do. I mentioned there are different types but left you all in suspense. Well here we are, at the exciting conclusion to a two-part nail-biter of a blog miniseries! Read on! One type of well are called DRIVEN wells-a small diameter pipe with a screened well point on the bottom is driven in the ground. These wells are relatively simple and economical to construct, but they can tap only shallow water and are easily contaminated from nearby surface sources because they are not sealed with grouting material. Hand-driven wells usually are only around 30 feet deep; machine-driven wells can be 50 feet deep or more. We see these wells in areas with a high water table such as the Eastern Shore.

And there are hand dug wells. Historically, dug wells were excavated by hand shovel to below the water table until incoming water exceeded the digger’s bailing rate. The well was lined with stones, bricks, tile, or other material to prevent collapse, and was covered with a cap of wood, stone, or concrete tile. Because of the type of construction, bored wells can go deeper beneath the water table than can hand-dug wells. Dug and bored wells have a large diameter and expose a large area to the aquifer. These wells are able to obtain water from less-permeable materials such as very fine sand, silt, or clay. Disadvantages of this type of well are that they are shallow and lack continuous casing and grouting, making them subject to contamination from nearby surface sources, and they go dry during periods of drought if the water table drops below the well bottom. There are still some active hand dug wells around. We have a customer with a dug well that is about 8’ in diameter and 60’ or so deep. It is lined with stone and their pump just hangs in the water; it’s a little scary to work on that well. Years ago, my dad had a customer in Randallstown with a hand dug well. According to the homeowner, it had been hand-dug by slaves in 1850. It was about 30’ deep, 5’ in diameter and lined with some of the most beautiful stonework you’d ever see. That well continuously produced water…never went dry. Unfortunately, the homeowner passed away, the property sold and the well filled in. I think it was a historical artifact.

So, there you go: a brief lesson on wells. Before we get into well pumps, I think we’ll talk a little about well water quality next week.

Until then, GO ORIOLES!

Water Wells 101

Pat Scheper

In our trade, when one mentions “PUMP” we naturally think of a well pump. Today’s topic: Water wells. To define it, a well is simply a deep, skinny hole in the ground from which we pump water.

well

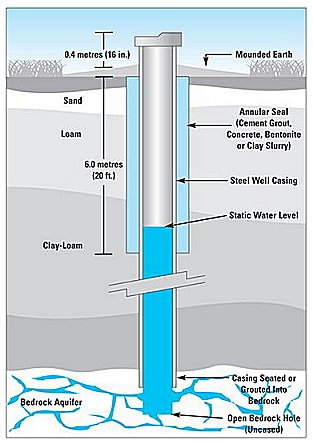
The illustration shows a typical 6” well such as we see in many yards. A well driller drills about an 8” diameter hole in the ground until he hits bedrock. He continues drilling 2 feet into the bed rock. He then inserts 6” steel or plastic casing into the hole until the casing rests on the bedrock. Once this is done, the driller pumps cement-like slurry (a semi-liquid mixture) called grout into the annular space between the casing and the hole up about 30 feet from the bedrock to hold the casing in place for the next phase. A smaller bit that fits into the casing is used to continue drilling into the bedrock. Once sufficient water is found, the drilling process is over. The driller then pumps more grout into the annular space to the surface. In addition to holding the casing in place, the grout hardens and prevents surface water from getting into the well and contaminating the water. Depending on local codes, the well casing will extend about 18” above grade.

What is “sufficient water” you ask? Well, that’s a deep subject (get it… Sorry, I couldn’t resist). Local health departments dictate sufficient water. The following is taken from the Carroll County Health Department web site: • Yield Test: Required of all new wells. Domestic wells must be capable of producing at least 1 gallon per minute. Also, at least once a day, the well must be able to produce 500 gallons in a 2-hour period. Well storage and tank storage is taken into consideration for this requirement. A well yield test must be conducted for a minimum of 3 hours. If after 3 hours, the well has consistently yielded 4 gallons per minute or more, the test may be terminated. If a well yields under 4 gallons, it must be yield tested for a minimum of 6 hours.

Here we go: We have a well that produces 1 gpm. That is 120 gallons in 2 hours. If we need 500 gallons in 2 hours to meet Health Department requirements, then we need 380 gallons storage in the well. At 1½ gallons /ft., we would need approximately a 253’ column of water from the bottom of the well to the static water line. If a well yields 10 gpm (a really great yield) then in 2 hours, it will produce 1,200 gallons! This certainly exceeds the 500 gallon requirement.

There is no minimum depth requirement for a well in Carroll County, although there must be at least 20 feet of casing. I’ve seen some wells in the county less than 100’ deep…they are generally older wells.

Now, there are other types of wells beyond the 6” drilled type we see in our area. BUT you’ll have to stay tuned and check back next week to find out what they are! (I love a good cliffhanger ending).

Back-Up Sump Pumps, Part 2 of 2

Pat Scheper

If you’ve been keeping up with our special “hump Day, Pump Day” series on sump pumps, you’ll remember that we’ve so far discussed sump pumps and their uses, and we’ve moved on to back-up sump pumps. Last Wednesday I went over one type of back-up sump pump with you, the battery-powered back-up. This week, I’ll explore the second type: water-powered back-up sump pumps. How do these work? Well, the pump utilizes a phenomenon know as the “Venturi Effect”. Essentially, CITY water flows through a nozzle in a pipe extending into the pit. The water flowing through the nozzle increases in velocity, thus decreasing pressure in the pipe. This decreased pressure “sucks” water out of the pit. It combines with the city water and is discharged to the exterior. Two bummers with this system: One- you MUST have CITY water. It will operate with a well pump, but if your electric goes off causing your sump pump to not work, the same power outage will cause your well pump to not work also. So, city water it is. Two- same as with the battery pump, the water powered pump will pump about ½ the volume as the primary pump. Again, this is still better than nothing.

I have seen some Do-It-Yourself videos on how to install a water-powered sump pump, and generally here are two rather important installation cautions that are either glossed over or ignored: first, back flow prevention. This pump is connected to your potable water system. It is also immersed in nasty water in your sump. This is known as a cross connection. It is possible for the nasty water to get into your potable water piping and contaminating it. The back flow preventer is designed to prevent this. However, there are varying degrees of cross connection hazard and, thus, various back flow devises. Back flow devises range from a dual check to a Reduced Pressure Zone back flow. Basically, back flow devises are a whole series of blogs that will bore you to tears. Suffice it to say, a back flow preventer is required on a water powered sump pump. My experience is that local codes require a Reduced Pressure Zone type of back flow. This is an expensive piece of equipment and must be tested by a licensed back flow professional. You don’t want to be cavalier about this-call your local plumbing inspector and make you have the proper back flow device installed-whether your hire a plumber or do it yourself.

Second, most installation videos show the discharge pipe from the water powered pump connecting to the discharge pipe of the primary sump pump. Again, check local codes. Some jurisdictions require the discharge pipe to run to the exterior INDEPENDENTLY of each other. Baltimore County, Maryland requires a reduced pressure zone backflow device AND separate discharge piping. Be attentive to the code requirements… they are there for your health and protection.

I trust by now, you’ve got the basic idea of sump pumps and their various back-up options. What do you have? Do you feel secure in the event of pump failure, a power outage and possible flooding? I hope so! Check back next week for an all new pump-related discussion!

Back-Up Sump Pumps: Part 1 of 2

Pat Scheper

On our first “Hump Day-Pump Day” we talked about sump pumps. As we learned, a sump pump is a very necessary item, especially when there are heavy rains. So, what happens when your electric goes out during a storm? Or when your sump pump just fails? Without a functioning sump pump, the rain water will eventually flood your basement. Just a ¼” of water, which is about 156 gallons per 1,000 square feet, can do great damage. It will soak your carpet, into wood molding the bottoms of cardboard storage boxes, furniture legs, etc. So if your sump pump fails to work during a storm, wouldn’t it be comforting and practical to have a back-up system? Fortunately, there are two sump pump specific products on the market that can help you out… This week we’ll look at battery back-up sump pumps.A battery back-up system is a small, secondary pump operated by a 12 volt DC, deep cycle marine battery. It is not intended to be the primary pump, nor can it operate indefinitely under battery power.

back up sump pump

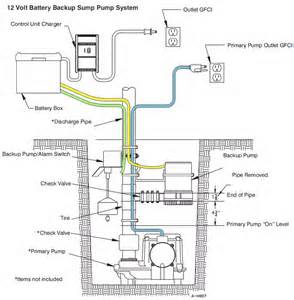
The illustration shown depicts a typical battery back-up sump pump system. The system consists of: • Small 12 volt pump • 12 volt deep cycle marine battery (typically sold separately) • A float switch/alarm • A charger/controller • A battery box • A tee with check valves • Associated wiring

The pump is installed in the sump and connected to the discharge pipe of the primary sump pump. The float/alarm is mounted above the primary pump. The charger controller keeps the battery charged and, on some models, sounds an alarm when the back-up pump kicks on. In addition, on some models, the controller sounds an alarm when the battery charge drops. The system operates in this way: When the primary pump fails, water in the sump rises above the “on” level to the level of the float switch. When the float switch rises it energizes the back-up pump and your basement is saved from drowning. Of course, the battery will eventually use up all of its electrons and the back-up pump stops running. My experience is that a fully charged battery will operate the pump for approximately 8-10 hours, which is plenty of time to have our plumbers out to replace the failed pump or to safely run electric to the pump from an exterior generator. There are some models that use two batteries, thus doubling your running time. Check it out, and check back next week for a (shorter than these first two, I promise!) post on the other type of back-up sump pumps.

Have You Checked THIS Lately?

Pat Scheper

Almost every house has one. It’s generally located in a damp, dark hole in the floor, and most homeowners pay it no attention until they are standing ankle deep in water during a storm. Yup, it’s your sump pump. sump-pump Think of your basement as a reverse swimming pool. Instead of a hole in the ground keeping water in, you have a hole in the ground trying to keep water out. I say trying because most basement structures fail at keeping rainwater and ground water out. The soil around your foundation is very porous and holds water like a sponge during wet times. If your basement is 8’ in the ground, then the wet soil is like having a column of water 8’ high pushing against your foundation wall at your footers. That column of water is equal to 3.5 pounds per square inch (psi). That may not seem like a lot of pressure, but try blowing 3.5 psi on a gauge! A grown man can blow a pressure of about 1.4 psi. So, when it rains, there is a very real chance of water getting into your basement. Various construction methods help direct this rainwater to your sump which is where the sump pump comes in play. A good 1/3 horsepower sump pump will discharge about 44 gallons per minute (gpm) at 10’ of head. What’s that mean?! It means the pump will pump 44 gpm through a vertical pipe 10’ high, which is about the maximum vertical lift for a pump in a buried sump in a basement 8’ in the ground. So, is 44 gpm good? Let’s do some math: Let’s just say you live on an acre of ground. That’s 43,560 ft². And let’s say we get one of those kick a** thunder storms that spring up in the summer (we wouldn’t know anything about this year would we…). This storm dumps an inch of rain in about an hour; a lot of rain to be sure, but not an unreasonable amount for a summer storm. An inch of rain on an acre of ground is 3,630 ft³ of water, and a ft³ of water is equal to 7½ gallons. Your acre of paradise just had 27,225 gallons of water dumped on it! Now, not all of that water is going to be directed to your house and into your basement. Not if your builder did his job in grading and installing rain leaders. But, some of this water makes its way to your house. Let’s say 5% of that 1” of rain is going to get to your foundation and seep in through the foundation. By the way, I have no idea exactly how much will get to your basement, this is a HYPOTHETICAL example. Five percent of 27,225 is about 1,361gallons of water. Now, let’s go back to our sump pump that can pump 44 gpm. That equals 2,640 gallons per hour. That is about double the 1,361 gallons we are assuming is going to get through your foundation wall. So a GOOD 1/3 hp sump pump should be sufficient. We use the Myers MCI033 at Apple Plumbing. It is a nice, solid, cast iron pump with a float rod switch (less likely to hang up in the sump). Other good pumps are Goulds and Zoeller.

You should check your sump pump once a year, or have us check it out. We do this by pouring water in the sump until the pump comes on and observe the rate of discharge. Is it a strong, steady stream or a weak one? Make sure the pump is sitting on a solid base and there is no debris, silt, mud or stone in the sump that could clog up the pump.

That was quite a lot of information, but it really is too late to find out your pump doesn’t work when your basement is flooded!

Stay tuned for next week's post on back up pumps!basement-pool-cartoon

Some Easy Water (and Money!) Saving Tips

Pat Scheper

The Carroll County Board of Commissioners has voted to increase water and sewer rates in order to pay for repairs to our sewer and water systems, which affects a large portion of our customer base. Because of this, I thought now would be an opportune time to remind everyone of a few basic actions we can take to ensure we're not wasting more water and money. These tips can save up to thousands of gallons of water. Potentially thousands of dollars, too. Many small problems can escalate to much larger issues if ignored. Routinely check for leaks. It's spring time, so our outdoor hose bibs (faucets for hoses) are once more being used. Check them for leaks! Do they drip when not in use? When you screw in your hose, does more water pour over the sides than is being funneled through it? The same goes for indoor kitchen and bathroom faucets. Even a small, seemingly inconsequential drip can waste a huge amount of water if it goes ignored for too long.

Check your toilets too. After flushing, make sure they don't continue to run. It's easy to barely notice the sound of a running toilet in the background, or to all of a sudden tune into it and realize it had likely been going for hours. Be aware!

Is your toilet an older model? You may want to consider an upgrade. Newer models use less water to flush, and many are designed specifically to use the least amount possible. You'd be surprised how those extra gallons per flush can add up!

There are other little things that can be done that we've all heard probably dozens of times: turn off the water while brushing your teeth. Wait to run the dishwasher and washing machine until you have full loads of dishes and laundry to clean.


These few, simple tips can conserve water and save you a headache and bigger dent in your wallet.

Shut Down Leaks with Leak-Guardian!

Pat Scheper

The Leak-Guardian® systems provide the best protection available for the prevention of uncontrolled flooding from pipes, hoses, etc. This system doesn’t allow loss of irreplaceable personal property, structure damage or thousands of dollars worth of remodeling efforts. The Leak-Guardian® system just shuts it all down!

The Leak-Guardian® system will prevent flooding from all of these common sources, and more:

  • Water supply hose ruptures
  • Water heater ruptures
  • Ice maker water supply line failures
  • Toilet overflows
  • Frozen or broken pipes
  • Washing machine and dishwasher overflows

The Leak-Guardian® system consists of a motor-operated valve, a controller/receiver and a battery-operated water sensor. The valve is installed on the water main directly at the main water valve. When the sensor detects water, it sends a signal to the receiver which in turn, closes the valve. The sensor is wireless and the controller has a radio receiver within it. An unlimited amount of additional sensors can be placed around the house at sites of potential leaks: water heater, kitchen sink cabinet, laundry room, toilets, etc.

The Leak-Guardian® offers two different systems available for purchase, both of which can be installed on either city water or a well water system: the basic system and the premium well tank system. The basic system includes the valve, receiver and one wireless sensor which can be placed anywhere in the house.

The premium well tank system includes one hard-wired sensor in addition to the valve, receiver and wireless sensor. The premium system also features a contact module within the standard receiver. This module allows for the installation of an electrical switch (contactor) which can then be wired to shut off power to the well pump when water is detected by one of the sensors. This option will detect the inevitable leaks that occur on features besides the main valve, including the well tank and other immediate piping and controls.

Call us for more details, 410.840.8118!

Winterizing your Plumbing

Ben Scheper

Subfreezing weather is right around the corner which means the possibility of frozen pipes and leaks.  You should take some precautions which can save you from property damage, big bucks and much heartache.

Frozen water pipes burst because when water freezes it expands.  This expansion causes a build-up of pressure in the pipe causing it to burse.

OUTSIDE FAUCETS:  We all have at least one outside hose faucet.  In the trade we call them hose bibs, sill cocks or frost free hydrants.  Today, we’ll refer to all three as a hose bibb. Usually each hose bibb has a valve inside the house which is used to winterize it.

This valve is generally located inside the house very near the hose bibb location. To winterize your hose bibb, you want to turn off the valve inside.  Outside, disconnect your hose from the bibb.  You will want to drain the water out of the hose to prevent one big coil of ice.  Open the hose bibb and leave it open.  A little bit of water should dribble out.

Next, you want to look around your basement for any water pipes that are on the outside wall.  If you had your basement finished or insulated recently, you want to look for pipes that have been covered up.  These pipes can freeze up in a real hurry on cold winter nights.

We had a customer a few years ago who called me on a Sunday night with 2” of water in his nice, newly finished basement.  Turns out the contractor installed 2 x 4 studs on the exterior wall and finished with sheetrock.  The pipe to the hose bibb ran down the exterior wall about 6’ from the ceiling and connected to the hose bibb.  With no insulation, and sheet rock isolating the pipe from the basement heat, the pipe froze, split and flooded his basement.  Carpet, wood molding, sheetrock and personal items stored on the floor were soaked. The wife was in tears.

A real mess that cold Sunday night.

Now, if your kitchen sink is on an outside wall, you will want to locate the hot and cold pipes feeding your kitchen sink in the ceiling of your basement.  Often there is an ‘overhang” on the rear of a house with the sink cabinet partially sitting on the overhang.  Your hot and cold pipes may be in this overhang and subject to cold air from below the overhang outside.  Check to make sure you have A LOT of building insulation around these pipes.  Also be certain that basement heat can reach these pipes in the overhang.  Even if you don’t have an overhang, your kitchen sink, or any fixture for that matter, may have  pipes in the basement ceiling that  may extend over your foundation wall and be very close to the band board (The outside board above the foundation wall) and not have insulation between them and the band board.  Check it out!

Check for small cracks in your basement walls near pipes.  You can do this by turning out the basement lights on a bright day and looking for sunlight.  On a cold, windy winter day wind blowing thru a crack onto a pipe will freeze that pipe almost instantly.  Even if the pipe is in a ‘warm” spot.

Don’t forget to drain the water out of your garden hoses before coiling them up for storage.

Finally, locate your main water valves and turn it off to make sure it works.  If you do experience a bursted pipe, you will know how to shut the water off quickly to minimize property damage.  Make sure everyone in your house knows how to shut off the main water valve.   That little piece of knowledge could save you thousands of dollars in damage and much heartache.

Pat Scheper, Vice President & Master Plumber Apple Plumbing & Heating


Reminder: Maryland Lead Free Plumbing

Ben Scheper

Back in December we told you about NSF/ANSI Standard 61 Annex G (NSF 61-G) and how it goes into effect nationally on January 1 2014.  NSF 61-G ensures that any plumbing product that delivers drinkable water is limited to ≤ 0.25% weighted average lead content. The state of Maryland however, has decided to enforce NSF 61-G two years in advance and it went into effect on January 1 of this year.

The most common items of concern for lead safety are brass and solder - copper, plastic, stainless steel and chrome are all lead-free.

Concerned about lead in your home or business? Call us today at 410-840-8118.

All of Apple Plumbing’s technicians have been trained on this new standard and can help you identify and rectify lead plumbing issues in your home or business.


Clever (and Funny) Customer Plumbing Fix

Ben Scheper

Check out the way someone fixed their broken toilet handle! It worked until someone in the household wanted to clip coupons while someone else was in the bathroom.

We think the colors clash a bit too.

Luckily they decided to call us and we fixed it in a flash. They now have a shiny new handle that matches the rest of the bathroom.

And no more having to schedule bathroom time around scissor use!

Do you have a clever or funny photo of a plumbing issue you found a quick fix for? Let us know and we'll post your picture and story. And you can schedule an appointment with us to have it fixed in a more conventional way too!

EPA Lead Free Laws to Go Into Effect in Maryland Jan 1 2012

Ben Scheper

The Environmental Protection Agency (EPA) will require all plumbing products to meet NSF/ANSI Standard 61 Annex G (NSF 61-G) effective January 1 2014. NSF 61-G is a standard to limit the weighted average lead content of plumbing products to ≤ 0.25% for any plumbing that delivers potable (drinkable) water.

The state of Maryland’s Department of Labor, Licensing, and Regulation has decided to amend the current plumbing code to enforce NSF 61-G two years in advance.

Starting on January 1, 2012, all plumbing systems under the Maryland State Board of Plumbing’s code delivering potable water will be required to meet NSF 61-G.

Most materials used in plumbing are naturally lead free or low lead.  Copper, plastic, stainless steel and chrome are all lead free.  Items containing brass and solder are the most common “leaded” materials.

Many plumbing items that traditionally had a lead content will now be stamped “LF”, “NSF/ANSI Standard 61 Certified”, or “NSF 61” to show they are low lead or lead free.  County and state plumbing inspectors will be looking at these items to verify they meet code requirement during inspections.

All of Apple Plumbing’s technicians and employees have been trained on this new standard and have a copy of the amended code in their company manuals.  If you have any questions regarding the new laws ask your technician or call our office.